PAL
was fond of overclocking (OC) or friend buy new hardware and want to
check out and test the performance and durability of the new hardware
(such as: RAM memory, Processor, VGA)? Easy sob
with the help of software OCCT TEST PAL can test the stability of
computer systems after mate overclocking (OC) or the use of the new
hardware. The OCCT TEST will display all the
information about the computer system PAL tested through several methods
such as linpack etc. Inquisitive sob?
What is the OCCT TEST?
The
OCCT TEST stability testers sofwtare is a computer system that can be
used to test the durability and stability of a computer system that has
been modified

The OCCT TEST features:
1. the method of testing for the system, memory, VGA, powersupply etc.
2. the results of the report are accurate and easy to understand graphs are accompanied
3. Support system for 32 bit and 64 bit
4. the full report and can be diexport in the form of images (PNG)
5. And other interesting features sob
Please try the OCCT TEST to test the durability and stability of computer systems PAL.
FOR DOWNLOAD
 OCCT | Size: 6,7 MB
 and if you need password ...
Good afternoon friends cyber ...Hows you?? certainly well right.
Okay ...This time I will give you a little piece of software that may be useful to you.
The latest version of Eset has no sob that Eset NOD32 Smart Security 4. Eset NOD32 Smart Security 4 has a feature called the latest anti-theft. The
feature has advantages can track our computer or notebook is lost or
stolen so long as not reformatted it is virtually certain that the
missing goods positions can be found again. Inquisitive sob?
What is Eset NOD32 Smart Security 4?
Eset NOD32 Smart Security 4 is the latest Eset security software output with more advanced features

Features of Eset NOD32 Smart Security 4:
1. Anti-theft that can track your computer or notebook is missing
2. the use of resources which is lower than the previous version
3. an increase in the speed of scanning data
4. more cool GUI and attractive
5. other cool features and sob
Please try Eset NOD32 Smart Security 4 let computer protection PAL will be increasingly yahud features with the new Eset
For download :
LINK DOWNLOAD
Eset NOD32 Smart Security 6 (32 Bit) | Size: 68 MB
Eset NOD32 Smart Security 6 (64 Bit) | Size: 74 MB
Eset NOD32 Smart Security 6 (64 Bit) | Size: 74 MB
If you need password

 Oh
yes, for temen-temen who have yet to figure out what it was windows xp
recovey console can read my post about accessing windows xp recovery
console, the windows xp recovery console command line and how to repair
damaged windows with the recovery console, hopefully some discussion of
that article can give a little description of the windows xp recovery
console.
Oh
yes, for temen-temen who have yet to figure out what it was windows xp
recovey console can read my post about accessing windows xp recovery
console, the windows xp recovery console command line and how to repair
damaged windows with the recovery console, hopefully some discussion of
that article can give a little description of the windows xp recovery
console.
Well,
for the case I encountered yesterday was a computer restart shortly
after boot or start up a computer so that it can't get into the next
process that start up windows xp. Error message that appears more or less as follows:
"We apologize for the inconvenience, but windows did not start succesfully. A
recent hardware and software change might have caused this .... "and
then below we are told to choose boot in a manner as follows:
1. Safe Mode
2. Safe Mode with networking
3 Safe Mode with command prompt
4. the Last known good configuration, and
5 Start Windows Normally
By
selecting Last known good configuration is usually windows can start up
normally, but if the damage was severe enough for example there is
damage on the master boot record, boot sector or file structure hard
drive, the computer will restart again. The steps that we can do is try to fix the hard disk with the windows xp recovery console, follow the steps:
1.Set the BIOS to boot first made computer via cd/dvd rom drive.
2.Windows XP setup CD input, and let it start up process is running from a CD
3.The display appears after the "Welcome to setup" as shown below, press "R" to access the windows xp recovery console

4. Type the number 1 and the windows administrator password (windows klo ga dipassword aja, press enter) on the display as follows:

5. To repair a corrupted boot sector of partition type fixboot command: C:

6. To fix the master boot sector (mbr) damaged type command: fixmbr
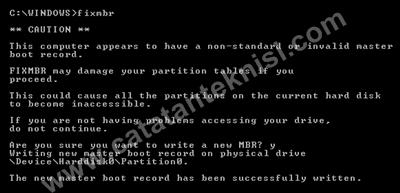
7.
to repair the bad sectors, lost clusters, cross-linked files, and
directory errors that damaged type command: chkdsk c:/r as I discussed
in the article how to fix hard drive.
8. Furthermore, to exit from recovery console type the command: exit
9. Normally, after checking and repair hard drive with chkdsk command boot process will be back to normal.
So how do I fix a computer that keeps restarting when booting using the windows xp recovery console. The damage is usually caused by a power failure which resulted in damage to the hard drive. Good luck good luck ... :)
Have you ever had a problem with computers that you use? I'm
sure almost all users of a computer (Windows PC) never experienced it,
ranging from damage to your computer can not boot, a virus that destroys
up to the vanishing files or data accidentally. If you experience a problem computer damage as above, it's good to try UBCD4WIN CD.
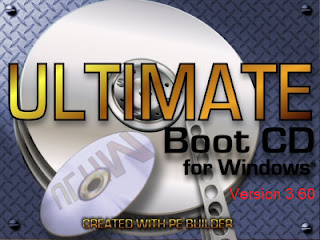
UBCD4WIN CD is a Windows Recovery CD that is useful for performing troubleshooting various damage to the computer. UBCD4WIN
is developed around the year 2004 using pre-installed Bart's technology
to create a system of Windows XP that you can lean on the run from a CD
or USB.
In
addition to the lean and can be run from CD or USB, in UBCD4WIN CD also
has included a variety of programs for troubleshooting and diagnosis of
various computer problems, repair windows errors, remove viruses, data
backup and restore system.
UBCD4WIN contains a variety of applications by category as follows:
1. Anti-Spyware Tools AntiVirus
2. the Applications Tools, Firefox, Opera, PDF Reader, Notepad ++
3. CD Burning Applications, DeepBurner
4. Disk Tools, Backup/Cloning, Defrag, Diagnostic, Partition, Security Management, File Compression, Explorers, Recovery,
5.
Linux Tools, Network Tools, Password Tools, Registry Tools System
Information Tools, Benchmark Tools, Information & Diagnostic Tools
6. more information can be found at: http://www.ubcd4win.com/contents.htm
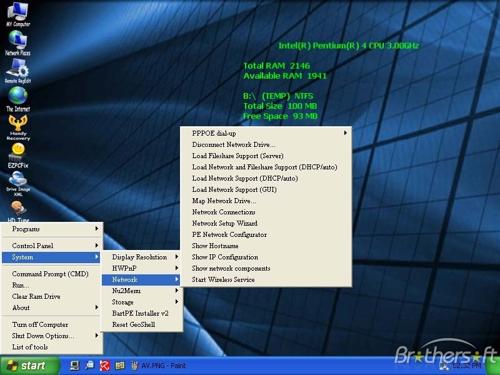
The last version of UBCD4WIN is UBCD4WIN 3.60 release 269MB-July 13, 2010. For temen-temen who want to try, please download the file at http://www.ubcd4win.com/downloads.htm or directly here
To temen-temen know, UBCD4wIN CD is not our direct download in the form of files.ISO, for example, but this CD we create your own applications with the help of UBCD4WIN. This is because basically the CD using Windows XP operating system that needs to be licensed.
The process of making this UBCD4WIN CD on its own is not difficult, below is the step-by-steps to do:
Step 1: Install UBCD4WIN on the computer
1. prepare the Windows XP Installer CD.
2. prepare a CD-R is empty
3. run UBCD4WinV360 program and Extrak .exe file that has been downloaded to install it on your computer.
4. by default will create a UBCD4Win folder on drive c.
2nd step: create ISO image file UBCD4WIN
1. put the CD Installer WindowsXP
2. run the UBCD4WinBuilder program.
3. when there is a question of "Search files" select "No" wrote
4. Specify the location of the Windows installer CD and location to an ISO image

5. click the Build and follow the next steps to complete.
3rd step: Mem-burning ISO image file to CD
1. put a blank CD
2. run the memburn program to ISO image, such as Nero, InfraRecorder or CD Burner XP.
3. Burning the ISO file to the CD. UBCD4WinBuilder.
4. complete.
Thus
the note about how to make a UBCD4WIN CD Windows Recovery CD is very
useful especially for users of Windows XP to perform diagnosis and
troubleshooting computer problems. Hopefully is useful ...!!
New
features Fast Startup on Windows 8 gave rise to risk on the integrity
of the filesystem if other operating systems are used to perform the
writing on a Windows partition. Data loss allegedly occurred on a dual boot configuration involving Linux and Windows 8.

To
avoid data loss and inconsistencies filesystem, users who installed
Windows 7 and Linux on the same computer it is advisable to disable Fast
Startup that introduced by Windows 7 and active by default. Features
Fast Startup creating an issue because the feature does not turn off
Windows 8 in full, but directs it in hibernation status
specifically--although it looks like a real be booted when revived as
all applications have been closed. Keep in mind,
the Hibernate feature Fast Startup, Windows 8 will save your Windows
session information--such as your cache (cache) that contains the status
of the filesystem was last of the FAT and NTFS partitions
associated--in image memory is restored during the Fast Startup.
This
can lead to data loss when other operating systems is used to do the
writing on this partition type easily: once reawakened, which counted
off, but it's actually dihibernasikan, Windows will restore your
operations with old data and information the filesystem. The
risk arises not only when Linux installed on the disc in parallel, but
also appear when other access types that differ from the base--such as
Windows 7 and Windows PE 3.0 or from the recovery system be booted from a
CD or USB Flash Drive.
In
the test, the problem may appear when turning off System Windows 8
installed recently (fresh install) from the menu and then create a new
file on the Windows partition with Linux distributions. After the sequence of the system (system sequence) starts, the newly created file does not appear in Windows. After
removing the catch (unmounted) and associate (remount) partition
testing, and after turning off your Windows with restart Windows, the
files show up but can not read or corrupted. File edits are also often damaged. Although
Windows is able to recover the filesystem system trials, it took up to
an hour to fix 1.5 TB NTFS partitions, and a handful of files created or
modified with Linux is lost during the process.
This problem is not new. On
Windows 7 and older versions of Windows, there are also similar issues
but on Fast Startupnya Windows 8 going on continuously considering most
people menghibernasi their system without realizing what they really do.
It is also potentially a problem when users use
the Suspen-to-Disk on Linux and then load a different Linux when
hibernation appear, but rare circumstances when the use of the ordinary.
Prevention
The
developers of the ntfs-3 g filesystem drivers FUSE which is used widely
by most Linux distributions have been aware of this issue since
mid-September. Then, they integrate the two modifications to the main development branch of the driver; These
changes cause the NTFS partitions can only be associated with a
read-only mode (read-only) if the driver detects a Windows system with
Fast Startup. This is done with the memeriksaversi ID disk NTFS metadata dri.(1, 2).

In fact, there is no release of ntfs-3 g driver new version that incorporates the changes; the last version of ntfs-3 g is almost a year ago. The
developers of ntfs-3 g has been doing so, inform the developers of
Fedora, which received two of these changes and integrate it on an
update driver for Fedora 13.
Debian,
openSUSE and Ubuntu, as well as most other Linux distributions have not
been included in this update for the sake of providing protection and
kernel driver FAT does not detect whether the partition used by Windows
systems that enable Fast Startup. Therefore, users who have a dual boot Linux on a PC with Windows 8 smooth always consider precautionary measures. Ntfs-3
g Driver who hasn't been on the patch does not give the user a warning
if the hibernation file on the Windows system partition; in fact, the driver is not able to detect whether a system has enabled Fast Startup on the other partition.
Klaus Knopper tells us that Knoppix 7.05 have included patch Fast Startup to ntfs-3 g driver. Also
it seems to give the user the option to associate a partition by
can-written (writable) and delete the hibernation file so that Windows
can do a reload to perfection when the next pemulaian.
It is recommended for anyone who frequently use both operating systems to disable Fast Startup. How, open Control Panel and select the link "Choose what the power button does" under Power Options. Click on the "Change settings that are currently unavailable"; This will expose the panel with more choices where you can turn off the checkbox "fast Turn on startup". Without the features Fast Startup, Windows 8 will take somewhat longer to get started. Full
Hibernate Status that can be activated on the same panel should be
disabled centangannya, as Windows 8 maintain status information from all
the dikatikan filesystem in memory with this option.

With
a dual boot system, problems seem to also be prevented by writing the
bootloader GRUB 2 on a file instead of on the first sector of the disk
system; This file should then bootloader boot configuration is integrated with Windows 8. Start
the Linux bootloader through reducing the risk: in this manner, Windows
will release the catch him before partition booting different system. The same approach can also be done when a double memboot Windows 7 and 8 in order to avoid problems with this configuration. To do this, use the Windows 7 boot manager; This will occur if Windows 8 installed after Windows 7.
The
risk of losing data with Fast Startup or Hibernation does not only
occur in mounting Linux/Windows in parallel, but also appeared as a live
version of Linux is loaded – e.g. from a USB flash drive, CD or DVD. Users
who only occasionally load the Linux system does not need to turn off
the feature options Fast Startup as they could load Linux after
triggered by livelihood restarted on Windows; This option is only turned off the perfect Windows and allow other operating systems to start safely.
One way to connect two computers is to use the network cable or UTP cable is known. Technique of connecting 2 computers with UTP cable directly in the model network peer to peer or point to point.

So that both computers can communicate with each other, there are at least three things that we have to do, namely:
Make sure both computers have Network cards that have the driver installed.
Prepare the cable UTP cable with Cross Over. For
those who do not know the arrangement of wires cross can read my post
about the sequence of the cable UTP Straight and Cross Over.
1. Set the IP Address of the second computer by IP Address is different but with the same subnet. As an example:
2. A computer IP Address: 192.168.1.1 with subnet mask: 255.255.255.0
3. IP Address of computer B: 192.168.1.2 with subnet mask: 255.255.255.0
After
the cable UTP Cross Over is installed, the next step is to set the IP
Address manually on each computer, here's how the computer with OS
Windows XP:
1. click on Start-Control Panel, double-click Network Connections.
2. right-click on the Local Area Connection icon, click Properties
3.
in the Local Area Connection Properties window, highlight Internet
Protocol (TCP/IP), and then click the Properties button as shown in the
picture below:
4. a window will open the Internet Protocol (TCP/IP) Properties, enter the IP Address as in the picture above.
5. Do the same on the other computer. Set with a different IP Address.
To
test whether the communication between the two computers is already
successful, do PING commands between computers via command prompt, if
successful will appear a message like the picture below Repply.

If the computer cannot PING each other, checking such as the following:
1. Check the connection cables UTP Cross Over whether is correct
2. make sure the LAN adapters already active (enable)
3. check the IP Address of the second computer, is it one subnet
4 turn off your Firewall or enable (check) the option File and Printer Sharing Exception in Windows Firewall.
If
both computers are connected then we can share data between computers
or resource such as using printer sharing or short messaging each other
over the network. For information about how to share data between computers in a network I will discuss in the next post.
WiFi
network is a wireless network technology (communications network that
does not require wires) which are currently widely used for making small
to large networks. In addition to using WiFi,
media that can be used on this wireless network such as Bluetooth,
Infrared Data Association (IrDA) and HomeRF.
According
to wikipedia, the sense of a WiFi stands for Wireless Fidelity is a set
of standards that are used for wireless LAN (Wireless Local Area
Networks-WLAN) based on the IEEE 802.11 specifications. Today
there are four variations of 802.11, namely: 802 .11A, 802 .11b, 802.11
g and 802 .11n with data rate up to 300Mbps (downlink) and 150Mbps
(uplink).
Then what is Adhoc Wifi network?
WiFi
networks are Ad hoc WiFi network mode that allows two or more device
(computer or router) to communicate with each other directly (known as
peer to peer) without going through the Central Wireless Router or
Access Point (AP). While the WiFi network using
an Acces Point Router to connect between all client resources with other
Network Infrastructure mode WiFi network called.

How to create an Ad Hoc WiFi network on Windows 7
In this article I will try to create an Ad Hoc WiFi network on a laptop using Windows 7 operating system. It's easy as follows:
1. do not forget to activate the first WLAN on a laptop.
2. click the Windows Start button, in the Search programs and files type: adhoc then enter.
3. Ad Hoc Network Setup Window will open, click Next to continue

4.
in the column "name" with the name of the contents of the Network we
will use as an example: SSID, catatanteknisi, select a security mode; WEP, WPA2-Personal or Open. The
contents of the Security key the contents with a password for example
password, select the option Save this network, then click Next
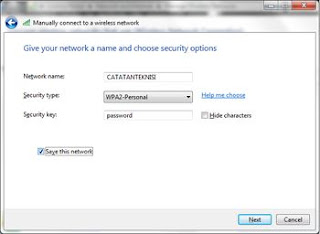
5. Once The window pops up catatanteknisi network is ready to use, click Close
6.
check the WiFi connection by clicking on the wireless icon on the
taskbar to the right, it would seem the status catatateknisi-Waiting for
users.

Ad
Hoc WiFi network settings in Windows 7 was finished, then we can use
another laptop or computer with usb wireless to connect with the
"catatanteknisi network" that we have made. If there are users (laptops) that connect to the network, then the WiFi status in step no. 5 will change to Connected.
So
how to create an Ad Hoc WiFi network on Windows 7 if the computer we've
linked to ad hoc networks that have been created, then we can exchange
data or simply maen game. As a side note the Ad Hoc network performance will drop drastically with increasing number of computers. The next article will discuss about how sharing the internet with ad hoc wifi network.
There are many ways that we can do to prevent data-the data contained on a USB Pendrive is not accessible by others. Other
than through file encryption on Flash as it has been described in a
previous post, we can also use the program that serves as a data
protection tools for USB Pendrive. One of the programs to protect data on a USB Pendrive I have ever used is the USB Flash Security ver 2.1.1.

1. This program is used to Download site http://www.kashu-sd.co.jp/en or alternative download here
2. Do
data backup in advance all of the USB Pendrive to the USB hard drive,
because the Flash will be reformatted when the program is installed into
Flash.
3. Install USB Flash Security program to the hard drive.
4. Run the program by clicking on Security USB Flash USB Flash Security icon on your desktop.
5. Flash input that will be protected, Flash will automatically be detected.
6. Select the USB flash drive as RAM Tab will be protected. Click the install button to start the process of installing the program on a Pendrive. All data on the USB flash drive will be deleted (see the image above)
7. Input the password to access the Pendrive. Caution do not forget them.
8. Click OK to perform the installation of USB Flash Security to Pendrive. Wait until it is finished.
9. When you are finished, on a USB Pendrive would file UsbEnter.
10. Run the .exe UsbEnter by clicking twice on the file.
11. Input a Password which we have previously set to turn on system protection on a USB Pendrive. A progress indicator appears, wait until it is finished.
12. In
the windows explorer window we can enter into a USB Flash drive (for
example, drive E:) and enter all the data we have into it.
13. Once that is done we can unplug our USB on the computer, by first updating the USB eject Flasdisk us in Windows Explorer.
Now USB Flasdisk we have successfully protected, so every time we will access the Flash we have to enter the password first.
Tips
on choosing a USB Pendrive this deliberately I wrote for mere sharing
of experience in selecting a USB Pendrive would we buy. Just
be advised of some of my experiences and some USB flash drive as RAM in
buying temen, sometimes end up with a bad story, ranging from
speed-write medium (copy of data) up to a slow Flash unreadable and
corrupted Flash (dead-total) at all.
Some
damage as Pendrive Pendrive which read 0 bytes, pendrive error and some
other pendrive damage still can be fixed by using a software to repair
pendrive. But data stored in it sometimes can not be saved. For it to be keen on picking USB Flashisk before deciding to buy it.

flash disk
The following are some tips in choosing a USB Pendrive would we buy:
1. USB flash drive Brand
Specify
the Flash brand whose primary purpose is related to the quality,
standardization of products, software support, warranty and after-sales
service of the pendrive. Many over the counter brand Flash available such as: ADATA, KINGSTON, TRANSCEND, HP, NEXUS, PENDRIVE, SANDISK, and many more.
To
find brands that have a reputation of "good" in terms of quality and
service, we can look for tau on the internet such as through forums,
blogs and sites selling online, here we choose the most selling or much
reviewed and recommended others. Then we're looking for the official website to have a look at the features and services available.
2. storage capacity
Regarding the capacity of peyimpanan this Pendrive I have stories from the experience of a friend. This
time he bought a Flash online Flash with a capacity of 250 GB is priced
at Rp 150.000,-which in my opinion is very cheap for a capacity of it,
and I will in the liver can only say "Childr it seems fake and will not
last long". True enough in just a matter of weeks, the Flash has since been stopped garbage.
From the story above, I just want to say that we must be wise in determining the capacity of the Flash shall we buy. As
seen from its function as a medium of Exchange data, then the capacity
of the Flash certainly does not need to be too big and in fact any Flash
capacity could have been "cheated". Pendrive 2 GB size-4 GB in my opinion is enough to store temporary files.
3. the speed of data Transfer.
Data transfer speed is the speed that Flash to read data and store the data. A data read speed is usually higher than the speed of saving.
This data transfer speed will be decreased if using a USB cable or a USB hub. To check the data transfer rate of USB Flash application, we can use USB Flash Benchmark from usbflashspeed.com.
4. materials and form Casing for childr
In
addition to factors of art matters in my opinion of the material and
the shape of the casing is its design must be sturdy and able to protect
the Flash from the collision when falling for example. I myself prefer Flash casing made from rubber.
5. Security Features
For
those of you who want to save important data in Flash, it's good to
choose a Flash Disk that has features such as hardware security
encryption on USB Flash Disk Security NETAC and IronKey. But the price of flash disk of this type is quite expensive. To
add encryption on flash disk temen-temen could use data protection
software on the flash disk, use file encryption application TrueCrypt or
use.
6. pay attention to the authenticity Factor Flash Disk
Things
that we should pay attention to in choosing Flash next factor is the
authenticity of the (original) from the flash disk itself. In
order for the flash disk is that we buy pendrive original, it's good we
buy flash disk from trusted stores and do not easily tempted by cheap
prices on offer. Read more tips for choosing Flash falsu and the original can be viewed here.
So some simple tips how to select the flash disk. Hopefully it is useful.
At
first each of those files are written to a hard drive in a location
that is neatly arranged/each other, there is no free space (blank space)
between those files. As time goes by, not only
the files just kept filling up the hard drive, but it occurs also
changes on the old files, be increased, diminished even erased.
The
impact of these activities lead to a condition in which the placement
of these files does not neatly arranged again, where often there is
empty space because the data are erased and the placement of new pieces
of irregular file again. This causes the storage space on the hard disk used in inefficient and can reduce storage capacity. This is commonly referred to by the term "fragmentation on the hard drive".
Fragmentation on the hard drive it is natural and unavoidable. But
the impact of this fragmentation of the hard disk can cause the
computer runs very slowly because there's extra time to "find" the
location of several pieces of files scattered squiggly.
How to troubleshoot hard drive Fragmentation
In
order to overcome the fragmentation of the hard drive, all we have to
do obviously is to reorder the back files that are stored in a squiggly
termed "hard drive defragmentation". Simple illustration about the fragmentation and defragmentation of the hard drive can be seen in the picture below:

fragmentation and defragmentation of the hard drive
As
seen on the pictures, initially for terseusun files to mess with, then
once there are additions to the file first, then hard drive
fragmentation will occur. By running a defragmentation of the hard drive the files are arranged back to mess with.
To
perform a defragmentation of the hard drive we can use the built-in
windows Tool or use some third-party applications like defragler and
mydefrag.
Here's how to run the hard drive defrag tool can also be bawaaan on windows 7:
- Click Start-All Programs-Accessories-System Tools-Disk Defragmenter.

- defragmentation of the hard drive in windows 7
- Click Analyze to see how many percentage of fragmentation on the hard drive
- Click Defragment to begin the Disk defrag the hard drive.
Where necessary we can also schedule defragmentation of the hard drive and click the Configure schedule ...

As the owner of a computer of course we wanted a computer that we use is always in optimum condition. But
sometimes we don't care about the "health" of our computers, we use
every day but we never care so that the day our computer is getting
slow, unstable even frequent crashes.
In
this article I'll share simple tips about the 5 easy steps to optimize
your computer system in order to keep performance optimal.
1. clean the Windows Registry
To
clean the registry of this fact we can do this manually by deleting the
registry key that is not necessary, but surely this method is not
efficient. For it how to clean the windows
registry the easiest is to use the help of software as for example which
I often pake IE Wise Registry Cleaner.
2. Update Hardware Drivers
Drivers
that do not fit or are already obsolete (outdated) can cause a device
can't communicate well with other computer system so that could be
causing your computer to run slowly and unstable (often hang or crash). For that we need to constantly renew the drivers your computer by means of a mengupdatenya on a regular basis.
An easy way to update the drivers it needs is to use the help of software such as Driver updates with DriverEasy.
3. Wipe the hard disk from junk files.
Junk
files like the rest of the installation, temporary internet files,
history files, error logs and so on can slow down your computer's
performance. Therefore always make the files this garbage on a regular basis. To clean these files I think it is enough to run a disk clean-up tool default windows.
To
run a disk clean-up in windows 7, click the Start button, type: cleanup
on the Search programs and files, and then select the hard drive to be
cleaned.
4. Defrag hard drive
Do a defrag hard drive can optimize the computer system significantly. Therefore
do defrag the hard drive on a regular basis or after performing data
modification, such as installation programs and removing or adding a big
file. To do a defrag hard drive we can do it
with the default tool windows such as in the posting on how to defrag
the hard drive in windows 7 or using the help of other software such as
smartdefrag or defragler.
5. Clean your computer from Malware
Viruses, Spyware, Trojans are types of malware that can attack and damage to the computer system. Use Antivirus always updated to fortify your computer from any malicious programs. It's
good we always keep the computer in a way to avoid the malware, but if
your computer is already infected with a virus and other malware, use an
application such as malwarebyte is to clean up the malware or download
scan computer offline by using an antivirus rescue disk from a variety
of vendors such as antivirus AVG Rescue Disk.
on
the internet we certainly know what is a good online storage, it's like
4shared, mediafire, sharebest and many more of her as you can find on
the internet.
However
at this time precisely Tuesday, April 24, 2012 official Google
yesterday launched Google Drive, a media to peyimpanan and share your
files online-based cloud computing. For gratisnya service Google Drive gives us a space of 5 GB. While for Google berbayarnya Drive peyimpanan space serves up to 16 TB.
LIST GOOGLE DRIVE
1. to enjoy Google services Drive we need to log in to our gmail account here
2. you will be taken to the My Drives window, which is where Your files will be stored. If
you previously had a document in google docs, then the files that have
been created via google doc will be there in My Windows Drive.

3. my drive-google drive
In
the window My this Drive we can directly create documents (use the free
google docs) and press the button Create or upload documents from your
computer by pressing the symbol of hard drive (storage).
USE GOOGLE DRIVE IN YOUR COMPUTER
1. you can also download Google applications Drive for PC. With this application we can easily synchronize files on our computers to the storage space on My Drive.
2. once didonwload, install and run Google applications Drive for PC, after installed then login with your gmail account.
3. Once logged in, on the first time used will be shown a window like below:
4. advanced setup google drive
5.
by default Google Drive folder on your computer with the operating
system windows 7 will be stored in the folder "C:\Users\nama_user\Google
Drive". To specify a different location, click Advanced setup button wrote.
6.
once the process is finished, the folder location settings then we just
drag n drop aja files which we will save to Google Drive through that
folder.
Some
of the advantages of Google Drive is integrated with Google Docs and
allows users to access files or documents from anywhere and work on
documents with colleagues in the same time. The
user is also no need to bother installing a lot of software, because
Google Drive allows all sorts of file types, such as files with the PSD
format (photoshop) or HD videos are opened via browsers (e.g. Google
Chrome).
For
you who are interested in meyimpan file for this drive onlie with
google, currently Google Drive is available for computers with the
Windows operating systems and Mac, smartphone and Android tablet. From
the description on the official Google Drive, search engine companies
this will make Google iOS-based devices for Drive, i.e. iPhone, iPad and
iPod Touch.
How
to Reset the BIOS of the Motherboard of this computer is one of the
basic steps that were often performed in the process of computer repair.
Although I'm sure most readers of this blog
already know catatanteknisi how do I reset the computer BIOS, but ga is
no harm I wrote back in record time.
Though
seem trivial, but the steps to reset the BIOS incorrectly can cause the
motherboard BIOS or other components are damaged, at least that's what I
had ever experienced. Here are the steps how to
reset the correct BIOS I quoted with some changes from the article how
to Reset the BIOS Chip magazine Edition 02/2012.

The steps how to Reset the computer BIOS:
Make sure your computer is not connected to the power source. This
can be done by unplugging the power from kobel stop contacts and also
unplug the power supply (24-pin power cable) from the computer's
motherboard.
Wait a few moments to make sure the electricity has been lost. To accelerate the loss of (waste) of electric current on the motherboard, we can press the power button on the computer.
Search button or jumper labeled CLR CMOS. For this there is a jumper that consists of a 3 pin and 2 pin. To clear CMOS or BIOS reset, press the reset button. For
which type of jumper 3 pin, move the position of the other side while
the jamper type 2 pin jumper, then we stayed the second pin menjumper,
klo the difficulty of finding a standard jumper, just use a screwdriver
to the menjumper pin. The bottom line is that both pins to be connected (short). Let a few seconds in that position.
After
that move the back position of the jumper to its original position for
the pin type 3 or type 2 to disconnect the jumper pin. Input cable power supply motherboard. Make sure all terangkai correctly then that connects your computer to electric PLN.
Restart the computer. When the BIOS reset BIOS settings then successfully will return to its original position. And
in the case of damage to the computer is not booting, the BIOS after at
reset, usually the computer will be able to boot back up.
When you reset the BIOS did not work, redo steps 1-2, then unplug the battery BIOS and redo step 3-5.
If
managed well, repeat 1-2 steps back, disconnect all power supply cables
on the motherboard off battery, BIOS and Memory (RAM) your computer. Repeat steps 3-5.
The
final step to reset the BIOS in a way above have not managed well are
back did steps 1-2, then off all the components on the motherboard,
Processor, RAM and other additional Cards as VGA card. clear the
returned motherboards from dirt and repeat step 3 above, this time used
to let stand for 30 minutes. Then repeat steps 3-5.
Thus the steps how to reset the BIOS on the motherboard of the computer. Good luck ...
How to combine multiple pdf files? There are times when we need to merge multiple pdf files into one pdf file. Suppose
for temen-temen who have downloaded the free materials for example on
English language courses from belajaringgris.net then there is material
in the form of pdf files created separately, one pdf file for each
chapter.
Advantages
of combining multiple pdf files into a single finger is that we can
combine the separate materials into one file only and of course to make
it easier when we want to print the whole of such content.
To
combine multiple pdf files we need the help of software such as PDFsam,
an opensource application which can combine multiple pdf files into one
pdf file only and also does the reverse, namely split one pdf file into
several pdf files.
Here's how to combine pdf files use pdfsam:
1. Download pdfsam here
2. Install and run the application to pdfsam window appears as follows:
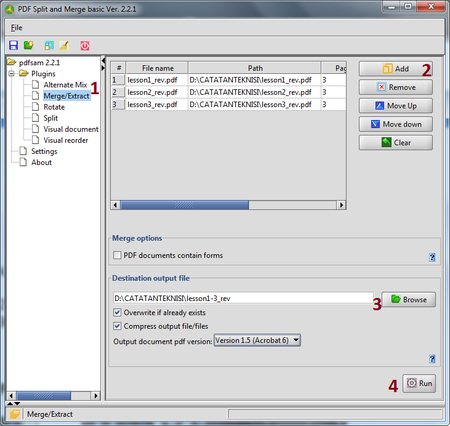
3. free pdf split and merge
4. click the Merge/Extract (No. 1)
5. click the Add button (No. 2) and add the pdf files that are about to merge.
Specify the folder where the file storage results (output file) (No. 3)
6. Finally click the button Run (No. 4) to begin the process of merging pdf files.
In addition to using application pdfsam, to combine multiple pdf files we can also use other applications include:
1. the PDFill PDF Tools
In
addition to combine pdf files, this application PDFill PDF Tools can
also perform encryption, reformat pdf pages, add information, header,
footer, watermark, etc.
2. a PDF Binder
The application is very simple to combine pdf files.
3.
Combining pdf files online, simply visit www.pdfmerge.com, upload
multiple pdf files and file merger can be didonwload directly.
Thus the number of ways to combine pdf files, if the file shall we merge not formatted.PDF, we can change the first file into pdf format with the help of the application free pdf converter.
good evening all, I apologize for posting an that is not up to date, as due to busyness.
ok ...now I will share a few tips for you yaiut how to create ISO image file of Windows 7.
In
a note on the "how to install Windows 7 from USB Pendrive" use the
Windows 7 USB/DVD Download Tool, we need the installer files from the
Windows 7 operating system in the form of ISO image file. Then how klo we only had windows 7 source in the form of pieces of DVD? Calm aja, in this occasion we will try to create a windows 7 ISO image file from the DVD Installer.
To create ISO image file from the Windows 7 DVD, we need the help of software such as ImgBurn. ImgBurn is a freeware application for burning CDs, DVDs, HD DVDs and Blu-ray. ImgBurn has several main features, namely:
Read-Create image file from disc
Build-Create an image file from files on your computer or network-or you can write the files directly to a disc
Write-Write an image file to a disc
Verify-Check a disc is 100% readable.
Discovery-Put your drive/media to the test!
To make ISO file from DVD Windows 7 this we will use the Read mode (create image file from disk). The following the steps:
1. Download first file ImgBurn here
2. To Install and run the program ImgBurn to window appears as below:

3. Click on the button Create image file from disc
4. Select the Source (DVD) and the Destination (the location and file name.The ISO will we make).

5. Then click the button Read, to begin the process of creating the ISO file.
6. Wait until the process is complete and the notification window will appear "Operation Successfully Completed!"
Now we have a file (image.ISO DVD files) from Windows 7. In
addition to making the Windows 7 installer from USB, ISO image file can
also be used as a backup from the Windows 7 DVD we have.

Banyak sekali orang-orang selalu bertanya-tanya.. kenapa iklan saya masih tidak ada yang mengklik,tidak ada pengunjungnya.ah pertanyaan itu seringkali dijawab dengan berbagai macam jawaban yang berbeda-beda, misalnya trafik anda yang sedikit, blog anda belum populer, penempatan iklan kurang strategis, dll sebagainya. Oke kali ini Blog Trik dan Tips akan memberikan solusi untuk anda meningkatkan penghasilan dari iklan ppc. Tentunya hal ini berkaitan dengan penempatan iklan anda pada blog.

Selamat Malam agan..agan..saya mau posting nih mengenai Adsense, anda sudah pada tau kan apa itu google adsense?? Ya..!! Google AdSense adalah cara yang cepat dan mudah bagi semua golongan penayang situs web untuk memperoleh uang dengan menampilkan iklan Google yang bertarget dan tidak mengganggu di situs web mereka.
Disini Anda dapat menampilkan beberapa jenis iklan dalam bentuk slide yang akan bergerak. Iklan akan ditampilkan bergantian dan akan berhenti ketika cursor mouse berada tepat diatas iklan tersebut. Trik ini sedikit rumit buat blogger yang masih newbie. Berikut ini saya akan berikan langkah-langkah cara membuat slide iklan tersebut:
1. Login ke blogger
2. Masuk ke Rancangn -- Edit HTML
3. Jangan lupa untuk memback up template sobat
4. Centang Expand Widget Template
5. Cari kode ini ]]></b:skin>
6. Letakan kode dibawah ini diatas kode ]]></b:skin>
.carousel{
float:left;
margin: 0;
padding:0px;
}
.carousel .widget {
width: 720px;
background:#c4d5ec;
margin: 0;
padding:0;
}
.carousel h2{
display:none;
}
.stepcarousel{
position: relative;
overflow: scroll;
width: 765px;
height: 160px;
}
.stepcarousel .belt{
position: absolute;
left: 0;
top: 0;
}
.stepcarousel .panel{
float: left;
overflow: hidden;
margin: 5px 20px 5px 0px;
width: 140px;
}
.stepcarousel .panel img{
float: left;
background:#940f04;
margin: 5px;
padding:5px;
border:1px solid #ccc;
}
.stepcarousel .panel img:hover{
background:#ffffff;
}
.quickedit{display:none}
#under_header{
opacity: 100;
}
Keterangan:
- Kode berwarna biru diatas adalah ukuran slide iklan atau carousel. Soabt dapat sesuaikan dengan lebar sidebar apabila ditempatkan pada area tersebut.
7. Letakan kode dibawah ini dibawah kode ]]></b:skin>
<script src='http://blogtrikdantips-blogspot.googlecode.com/files/slide_gallery1.js' type='text/javascript'/>8. Simpan template sobat
<script src='http://blogtrikdantips-blogspot.googlecode.com/files/slide_gallery2.js' type='text/javascript'/>
Selanjutnya kita akan menambahkan widget slide gallery tersebut pada elemen halaman atau pada pada sidebar blog sobat
1. Masuk ke Rancangan -- Elemen Laman
2. Tambah gadjetkan lalu pilih HTML/Javascript
3. Masukan kode dibawah ini pada gadjet tersebut
<script type="text/javascript">
stepcarousel.setup({
galleryid: 'mygallery', //id of carousel DIV
beltclass: 'belt', //class of inner "belt" DIV containing all the panel DIVs panelclass: 'panel', //class of panel DIVs each holding content autostep: {enable:true, moveby:1, pause:3000},
panelbehavior: {speed:500, wraparound:false, persist:true},
defaultbuttons: {enable: true, moveby: 1, leftnav: ['https://blogger.googleusercontent.com/img/b/R29vZ2xl/AVvXsEhd9rfVNPakJevm7CJbc1F51-r4d2dDYcKZ8P1GTFkuSMFcEc1cb6X8BJYmffs22Oh-uwMuFSgvxXwNVWBFHZRyQ5O-JS_fAAdxmnIWiG5901Qz-QghJ5NuphXV1bYy438VOuZFVNW6y-nd/', 30, 60 ], rightnav: ['https://blogger.googleusercontent.com/img/b/R29vZ2xl/AVvXsEjmS3LRgMHSwbh87W33npGdaLMhbjF3vD0sLMxgGE_egQHwh9Azub0fskFYycgp-UsZaCoxEbRoVf6hErhlFrNR1W3x27oRqx1va4CWb2wXK8uRS4F__ZRyiQSUaVPP4BdaW4n8vps9f_Eh/', -55, 60 ]},
statusvars: ['statusA', 'statusB', 'statusC'], //register 3 variables that contain current panel (start), current panel (last), and total panels
contenttype: ['inline'] //content setting ['inline'] or ['external', 'path_to_external_file']
})
</script>
<div id="mygallery" class="stepcarousel">
<div class="belt">
<div class="panel">
<a href="URL LINK ANDA">
<img src="URL GAMBAR ANDA" width="100px" height="135px" title="KLIK DI SINI" /></a>
</div>
<div class="panel">
<a href="URL LINK ANDA">
<img src="URL GAMBAR ANDA" width="100px" height="135px" title="KLIK DI SINI" /></a>
</div>
<div class="panel">
<a href="URL LINK ANDA">
<img src="URL GAMBAR ANDA" width="100px" height="135px" title="KLIK DI SINI" /></a>
</div>
<div class="panel">
<a href="URL LINK ANDA">
<img src="URL GAMBAR ANDA" width="100px" height="135px" title="KLIK DI SINI" /></a>
</div>
<div class="panel">
<a href="URL LINK ANDA">
<img src="URL GAMBAR ANDA" width="100px" height="135px" title="KLIK DI SINI" /></a>
</div>
<div class="panel">
<a href="URL LINK ANDA">
<img src="URL GAMBAR ANDA" width="100px" height="135px" title="KLIK DI SINI" /></a>
</div>
<div class="panel">
<a href="URL LINK ANDA">
<img src="URL GAMBAR ANDA" width="100px" height="135px" title="KLIK DI SINI" /></a>
</div>
Keterangan:
- Kode berwarna merah adalah url gambar iklan pada slide
- Kode berwarna hijau adalah url link iklan pada slide
About This Blog