One way to connect two computers is to use the network cable or UTP cable is known. Technique of connecting 2 computers with UTP cable directly in the model network peer to peer or point to point.

So that both computers can communicate with each other, there are at least three things that we have to do, namely:
Make sure both computers have Network cards that have the driver installed.
Prepare the cable UTP cable with Cross Over. For
those who do not know the arrangement of wires cross can read my post
about the sequence of the cable UTP Straight and Cross Over.
1. Set the IP Address of the second computer by IP Address is different but with the same subnet. As an example:
2. A computer IP Address: 192.168.1.1 with subnet mask: 255.255.255.0
3. IP Address of computer B: 192.168.1.2 with subnet mask: 255.255.255.0
After
the cable UTP Cross Over is installed, the next step is to set the IP
Address manually on each computer, here's how the computer with OS
Windows XP:
1. click on Start-Control Panel, double-click Network Connections.
2. right-click on the Local Area Connection icon, click Properties
3.
in the Local Area Connection Properties window, highlight Internet
Protocol (TCP/IP), and then click the Properties button as shown in the
picture below:
4. a window will open the Internet Protocol (TCP/IP) Properties, enter the IP Address as in the picture above.
5. Do the same on the other computer. Set with a different IP Address.
To
test whether the communication between the two computers is already
successful, do PING commands between computers via command prompt, if
successful will appear a message like the picture below Repply.

If the computer cannot PING each other, checking such as the following:
1. Check the connection cables UTP Cross Over whether is correct
2. make sure the LAN adapters already active (enable)
3. check the IP Address of the second computer, is it one subnet
4 turn off your Firewall or enable (check) the option File and Printer Sharing Exception in Windows Firewall.
If
both computers are connected then we can share data between computers
or resource such as using printer sharing or short messaging each other
over the network. For information about how to share data between computers in a network I will discuss in the next post.
WiFi
network is a wireless network technology (communications network that
does not require wires) which are currently widely used for making small
to large networks. In addition to using WiFi,
media that can be used on this wireless network such as Bluetooth,
Infrared Data Association (IrDA) and HomeRF.
According
to wikipedia, the sense of a WiFi stands for Wireless Fidelity is a set
of standards that are used for wireless LAN (Wireless Local Area
Networks-WLAN) based on the IEEE 802.11 specifications. Today
there are four variations of 802.11, namely: 802 .11A, 802 .11b, 802.11
g and 802 .11n with data rate up to 300Mbps (downlink) and 150Mbps
(uplink).
Then what is Adhoc Wifi network?
WiFi
networks are Ad hoc WiFi network mode that allows two or more device
(computer or router) to communicate with each other directly (known as
peer to peer) without going through the Central Wireless Router or
Access Point (AP). While the WiFi network using
an Acces Point Router to connect between all client resources with other
Network Infrastructure mode WiFi network called.

How to create an Ad Hoc WiFi network on Windows 7
In this article I will try to create an Ad Hoc WiFi network on a laptop using Windows 7 operating system. It's easy as follows:
1. do not forget to activate the first WLAN on a laptop.
2. click the Windows Start button, in the Search programs and files type: adhoc then enter.
3. Ad Hoc Network Setup Window will open, click Next to continue

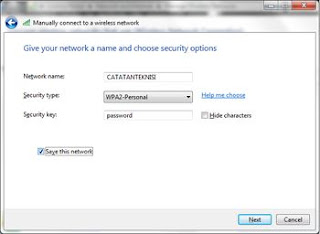
4.
in the column "name" with the name of the contents of the Network we
will use as an example: SSID, catatanteknisi, select a security mode; WEP, WPA2-Personal or Open. The
contents of the Security key the contents with a password for example
password, select the option Save this network, then click Next
5. Once The window pops up catatanteknisi network is ready to use, click Close
6.
check the WiFi connection by clicking on the wireless icon on the
taskbar to the right, it would seem the status catatateknisi-Waiting for
users.

Ad
Hoc WiFi network settings in Windows 7 was finished, then we can use
another laptop or computer with usb wireless to connect with the
"catatanteknisi network" that we have made. If there are users (laptops) that connect to the network, then the WiFi status in step no. 5 will change to Connected.
So
how to create an Ad Hoc WiFi network on Windows 7 if the computer we've
linked to ad hoc networks that have been created, then we can exchange
data or simply maen game. As a side note the Ad Hoc network performance will drop drastically with increasing number of computers. The next article will discuss about how sharing the internet with ad hoc wifi network.
About This Blog