have you using ipv6?

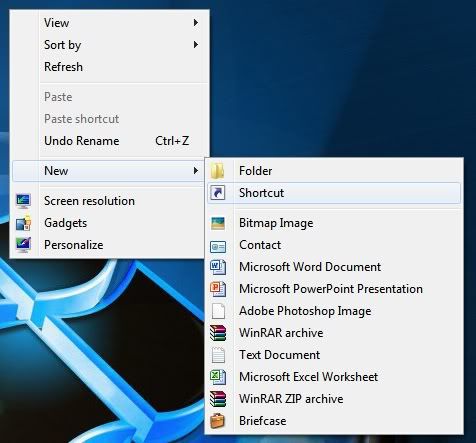
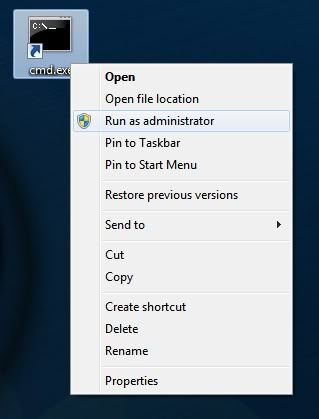
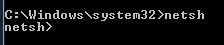
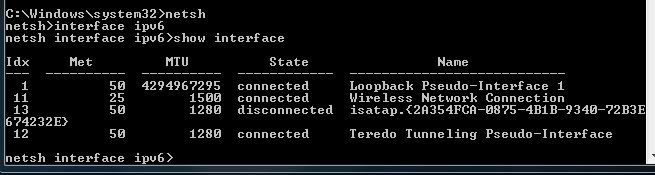
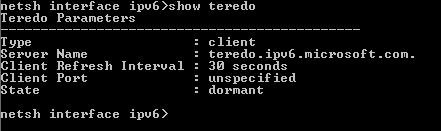
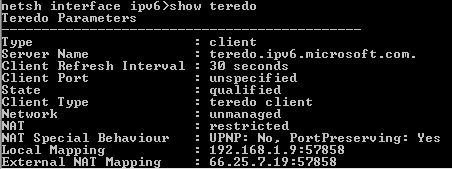
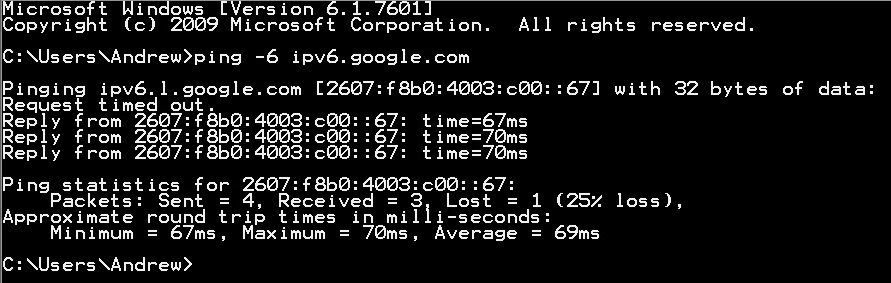
How To Use The Terredo IPv6 Tunnel..?

If you are using windows 7, IPv4 and IPv6 co-exist
Although more use IPv4.

Now here's how to setup that you use IPv6 exclusively.

1. right click on the Desktop (home screen), hold New > shortcut
Fill that column with "cmd.exe"/"cmd" press Next and Finish.
  
 
2. right click on cmd and select "Run as administrator".
 
 3. typing "netsh" and enter.
 
 4. typing "interface ipv6" and enter.
 
 5. typing "show interface" dan enter.
    Lihat koneksi mana yang kamu pakai dan harus "CONNECTED" tentunya.
    Karena koneksi ane memakai Wireless  dan dibagian Statenya Connected.
    Maka angka yang harus diingat adalah di bagian idx, dan idx ane adalah"11" 
 
6. chek used by typing "show teredo".
 
 7. sekarang ketik "add route ::/0 interface=X"  , X diganti dengan angka idx tadi. masukin angka idx ke dalam interface ya.
8. Sekarang chek lagi dengan mengetik "Show teredo".
 
 
8. close the cmd and reopen the same cmd but directly without administrator click run.

9. Type "ping-6 ipv6. google.com" and see if there are similarities (not Ipaddres) then it works.
 
 
                                           THANK YOU VERY MUCH


Read more


2 Tricks Back Up the Data in Google Docs

Cloud Computing is a web-based data storage service server that is increasingly evident lately. Internet giant google even had planned to release a Google Cloud Service that is currently in the stage of its development. However, now only the Google Cloud technology are already doing through the Google Docs service.
 
 
This article will discuss how to back up your data from Google Docs. Google Docs is a service office that started much in use because of its flexibility. When you are exposed to natural disasters that resulted in missing files from your hard drive, then the file on Google Docs will be Your Savior. But before that you should understand how to download.
 
There are two ways that are discussed, the first one is:
 
Backing Up data over Google Docs

1. log in to Your Google Docs account.
THIS IMAGE USE SPEAK INDONESIAN .. :-D
2. check the small box in the top of the list the title of the file to select all the files that exist.
 
 
3. then click the More > downloads.
4. then again click on the Convert button And Download. Continue by clicking the tab items. In this section    you will be able to set the file format converter, of the kind that exists. An example for this type of document, you can choose to use Microsoft Word or RTF format.
5. Google Docs aka begin to convert all the data you've got ZIP into shape.
6. Download and save the file to your hard disk, do you need it.
 
Backups using third-party applications
 
His pace is as follows:

1. Before download the application at www.code.google.com/p/gdocbackup and then install as normal and run.
2. click on the export tab format. Here there are some differences, in every type of document, you can choose to convert into some file types. Give a check mark in the Enable selection of multiple export and choose the file format you want.
3. then download and save the file on your hard disk.

Backing up with third-party applications indeed has its own uniqueness, where in the files to be downloaded You free to choose the type of files to be downloaded later.

                                                      THANK YOU VERY MUCH


Read more


The trick to convert the picture in a Word document to JPG, GIF or PNG

By default, Microsoft does not provide back up of any image file that is in a separate document so that when you get a document with an image in it you'd be hard-pressed to make a change in the picture because the image of the master file only exists in the document. Due to this problem you are faced with two difficult choices, first forget about the document you just get and writing your own from scratch or with difficulty or find pictures that are 100% the same, download and modify as needed. Of the two options, which one might be your choice?Menkonversi gambar ke format Doc
 

Two choices are offered equally tough, working on a thesis or theses starting from scratch without the supporting documents are the nightmare of every student, and make modifications without supporting files is a matter of the strange almost hard to find the way out. But, as the saying goes, where there is a will there is a way. It turns out there's one trick that can help you out of a difficult dilemma, you can mengkoversi any image that is in a Microsoft Word document into image formats such as JPG, GIF, or PNG format with great ease.


1 first, open the document that you want to take the picture and then click on the image you want, copy the picture by pressing ctrl + C or right click and click Copy.
Copy gambar yang ingin dicopy
The trick to convert the picture in a Word document to JPG, GIF or PNG
 
 
2 Secondly, run the application of Paint. Do I click on the Windows icon in the lower left corner. Then click All Programs Accessories >> >> Paint.
 
2 Secondly, run the application of Paint. Do I click on the Windows icon in the lower left corner. Then click All Programs Accessories >> >> Paint
.Buka aplikasi yang akan digunakan untuk konversi gambar
3. third, Paste it into the application image Paint and set the canvas size to fit the image. Then click the icon in the top left corner and hover over the menu Save as and select the image format You want, I recommend you to choose JPEG or PNG format. Just click the file format of your choice and the system will process a moment later.Jenis dan tipe file hasil penyimpanan
 
4. Fourth, give the name of the image file, you can also choose the right storage folders, and then click Save.
 Nama file hasil dari konversi gambar
5. Fifth, the images have been successfully saved in the format that you have set up and can be used according to your needs.
 Hasil gambar yang sudah dirubah ekstensinya
By having a master file of a document supporting images, you can freely make changes and adjustments in order to obtain maximum writing results. You can apply this trick on most Microsoft applications including Excel and Powerpoint. For maximum results, make sure you have made adjustments to the image size.
  
                                         THANK YOU VERY MUCH
 

Read more


Tips To Speed Up Your Computer's Performance

Tips speed up this computer in principle is to do a regular treatment either in hardware or software, the selection of applications that "lighter" and simplified tune-up on some windows settings with the goal of reducing CPU load and RAM so that in the end the computer that we use will work more optimally.

Before we make any changes to default (tune-up) to speed up your computer's performance, it's good we preview some of the following factors that could lead to computer performance is not optimal and continues to slow down, they are:
  •  ignore the Minimum Hardware Requirements, when installing an application.
All software/applications have minimal computer hardware specifications that are needed so that the application can run normally. And we remember it is a minimal specification, so that the application can run optimally computer specifications we should be higher than the system requirement of the application.
  •  Overheating on the component hardware, some hardware components which often happens overheat is a Processor, Mainboard, VGA Card and Power Supply. Overheat on the hardware components usually occurs because of its optimal cooling system does not work (for example a Processor fan), the computer is placed in a room that does have a fairly high temperature or it could be because the computers that operate 24 hours nonstop.
  •  Live time, computer hardware also can not fight age, especially for the capacitor components on the mainboard and the hard drive. In General, a computer that has been operating above 5 years it's high time it was upgraded or replaced.
  •  too much software installed, many of the processes that are running in the background, there are viruses, malware and spyware resource consuming Processor and Memory, which in turn can cause our computer is very slow.

After we find out some of the common causes of a slow computer, then it is time that we now prepare and do some tune up windows to speed up our computer.
  1. Know our computer specifications, please feel free to upgrade components primarily for RAM is still under 1 GB. If you are interested in buying a new computer, it seems to me the minimum specification is currently a classmate computer Intel Core 2 Duo 2 GHz, DDR3 RAM, 250 GB SATA hard drive and a 530 Watt Power Supply.
  2. Clear the hardware component, open the CPU casing and clean the dust that clings to the mainboard, fan and other peripherals using subtle brush and vacum cleaner.
  3. When does our computer spec pas-install install one program that really needed it. It's good also to use alternative programs which have a small size and don't take up a lot of resource, such as:
    • Open Office, to open and edit documents
    • Foxit Reader, to read PDF documents
    • Opera Mini, for faster and safer browsing
    • 7 Zip to create and open a file compression
    • VLC Media Player to run multimedia files
  4. Clean your computer from viruses, spyware and malware with virus scanner such as Norman Malware Cleaner, and then install antivirus that does not weigh my own computer, use avast free antivirus and make sure it is always update.
  5. Disable Automatic Update in windows, instead download the latest hotfix and security updates by using Windows Update Downloader from windowsupdatesdownloader.com 
    windows update manager
  6. Turn off/Disable Windows Services that are not used, the trick is as follows
    • Click start – run – type in: services.msc
    • Double click on the service that is not used, at the choice of the start up type select disable
    • Some service windows are usually unused include: Alerter, Clipbook, the Distributed Link Tracking Client, Fast User Switching, Help and Support, Indexing Services, IPSEC Services, the Netmeeting Remote Desktop Sharing, Portable Media Serial Number, Remote Desktop Help Session Manager, Remote Procedure Call Locator service, Remote Registry service, Remote Registry Service, Secondary Logon, Routing & Remote Access, Server, SSDP Discovery Service, Telnet, TCP/IP NetBIOS Helper, Upload Manager, Universal Plug and Play Device Host, Wireless Zero Configuration (for those who do not use wireless device). For computers that are not connected to the network disable also
    the computer Browser, Messenger, Windows Time.
     disable windows services
  7. Turn off some of the applications that run automatically at windows startup. I use tools Start-up Control Panel to control the program whatever need or don't need at start up when windows loads. Download the program at www.mlin.net/StartupCPL.shtml, and then run and disable some services that are not required
  8. Turn off System Restore on some partitions or entire drives. Besides being able to increase the speed of windows, mendisable this feature will avoid the boomerang that occurs due to a virus that is entrenched in the restore point files.
    • Here's how: right-click the icon My computer-click Properties-click System Restore tab – check Turn off system restore
  9. Clear your desktop of the shortcuts and files that are not often used. To save the data file you should save it in a folder or drive. Use a wallpaper that don't take up a lot of memory resource or just use the background color on the display of the desktop.
     
  10.  adjust Visual Effects for Better Performance,
    • Here's how: right click My computer click Properties click the tab – Advanced – Performance on the menu select settings,
    on the tab visual effects select Adjust for best Performance.
  11. Clear the temporary files that exist provide C: documents and Settings-namauser-Local Settings-Temp and C:Windows-Temp
     
  12.  Run the Disk Cleanup Wizard to compress old files and clean up the files that are not needed.
    • Do I click start – run – type: cleanmgr
  13. Run Disk Defragmenter on a regular basis to spruce up data-data stored on the hard drive.
    Do I click start – run – type: dfrg msc.
     
  14. Run Checkdisk tools to ensure the file structure on the hard drive and direktory free from error.
    • Here's how: Open Windows Explorer, right click on the hard drive in the scan, aka select Properties, select the Tools tab, select Error Checking, click Check Now.
    • check Automatically fix file system errors and Scan for and attempt recovery of bad sectors
     
  15.  Reinstall Windows and applications. If the computer where it was too much trouble, here's the last kick that we can do to make our computer back to the original performance, save all data to another hard drive or partition and then start again it all from scratch, reinstall Windows and other applications programs.
                                  THANK YOU VERY MUCH

Read more


Cara mendapatkan Pulsa gratis di tahun 2013

Hello indonesia...!! Selamat Sore.
di postingan kali ini saya akan mengajari anda bagaimana cara mendapat kan pulsa pasti nya di tahun 2013 yang bahagia ini...siapa sih yang tidak mau dengan pulsa gratis... anda juga akan mendapatkan point setiap mengundang teman dan point tersebut akan di undu untuk mendapatkan pulsa Rp 100.000 yang setiap undiannya akna mengundi 50 Voucher Rp 100.000


tunggu apa lagi .. yuk langsung dapatin pulsa nya..
langkah-langkah ntuk dapatin pulsa nya gini gan...
1.  pertama-tama anda klik DAPATKAN PULSA
2.  tanpa basa-basi anda masukkan dah nomor anda,seperti gambar di bawah ini nihh

3. setelah itu monggo gan..pilih nama operator nya  dan Next.
4. Anda akan di kirimkan pesan SMS dari pihak website itu sendiri , Sms itu berisikan  kode verifikasi , lalu isikan kode tersebut di website tersebut.
5. Siap dah..

Gampang bukan...

Read more


Software OCCT TEST Test The Stability Of Your Computer System!!

PAL was fond of overclocking (OC) or friend buy new hardware and want to check out and test the performance and durability of the new hardware (such as: RAM memory, Processor, VGA)? Easy sob with the help of software OCCT TEST PAL can test the stability of computer systems after mate overclocking (OC) or the use of the new hardware. The OCCT TEST will display all the information about the computer system PAL tested through several methods such as linpack etc. Inquisitive sob?

What is the OCCT TEST?
The OCCT TEST stability testers sofwtare is a computer system that can be used to test the durability and stability of a computer system that has been modified
OCCT Software Uji Kestabilan Sistem Komputer!!
 
The OCCT TEST features:
1. the method of testing for the system, memory, VGA, powersupply etc.
2. the results of the report are accurate and easy to understand graphs are accompanied
3. Support system for 32 bit and 64 bit
4. the full report and can be diexport in the form of images (PNG)
5. And other interesting features sob

Please try the OCCT TEST to test the durability and stability of computer systems PAL.
 
FOR DOWNLOAD
OCCT Software Uji Kestabilan Sistem Komputer!!OCCT | Size: 6,7 MB
OCCT Software Uji Kestabilan Sistem Komputer!! and if you need password ...

Read more


Eset NOD32 Smart Security 6!!

Good afternoon friends cyber ...Hows you?? certainly well right.
Okay ...This time I will give you a little piece of software that may be useful to you.

The latest version of Eset has no sob that Eset NOD32 Smart Security 4. Eset NOD32 Smart Security 4 has a feature called the latest anti-theft. The feature has advantages can track our computer or notebook is lost or stolen so long as not reformatted it is virtually certain that the missing goods positions can be found again. Inquisitive sob?

What is Eset NOD32 Smart Security 4?
Eset NOD32 Smart Security 4 is the latest Eset security software output with more advanced features
Eset NOD32 Smart Security 6!!
Features of Eset NOD32 Smart Security 4:
1. Anti-theft that can track your computer or notebook is missing
2. the use of resources which is lower than the previous version
3. an increase in the speed of scanning data
4. more cool GUI and attractive
5. other cool features and sob

Please try Eset NOD32 Smart Security 4 let computer protection PAL will be increasingly yahud features with the new Eset
For download :
LINK DOWNLOAD 
Eset NOD32 Smart Security 6 (32 Bit) | Size: 68 MB
Eset NOD32 Smart Security 6!!
Eset NOD32 Smart Security 6 (64 Bit) | Size: 74 MB
Eset NOD32 Smart Security 6!!
If you need password
Eset NOD32 Smart Security 6!! 
forgive me if that link I get from other people's links.

Read more


Fix The Computer Restarts While Booting


windows recovery console imgOh yes, for temen-temen who have yet to figure out what it was windows xp recovey console can read my post about accessing windows xp recovery console, the windows xp recovery console command line and how to repair damaged windows with the recovery console, hopefully some discussion of that article can give a little description of the windows xp recovery console.

Well, for the case I encountered yesterday was a computer restart shortly after boot or start up a computer so that it can't get into the next process that start up windows xp. Error message that appears more or less as follows:

"We apologize for the inconvenience, but windows did not start succesfully. A recent hardware and software change might have caused this .... "and then below we are told to choose boot in a manner as follows:

1. Safe Mode
2. Safe Mode with networking
3 Safe Mode with command prompt
4. the Last known good configuration, and
5 Start Windows Normally

By selecting Last known good configuration is usually windows can start up normally, but if the damage was severe enough for example there is damage on the master boot record, boot sector or file structure hard drive, the computer will restart again. The steps that we can do is try to fix the hard disk with the windows xp recovery console, follow the steps:

1.Set the BIOS to boot first made computer via cd/dvd rom drive.
2.Windows XP setup CD input, and let it start up process is running from a CD
3.The display appears after the "Welcome to setup" as shown below, press "R" to access the windows xp recovery console
windows xp recovery console image
4. Type the number 1 and the windows administrator password (windows klo ga dipassword aja, press enter) on the display as follows:
mengakses windows xp recovery console 
 
5. To repair a corrupted boot sector of partition type fixboot command: C:
fix boot sector windows xp
6. To fix the master boot sector (mbr) damaged type command: fixmbr
fix master boot record windows xp
7. to repair the bad sectors, lost clusters, cross-linked files, and directory errors that damaged type command: chkdsk c:/r as I discussed in the article how to fix hard drive.
8. Furthermore, to exit from recovery console type the command: exit
9. Normally, after checking and repair hard drive with chkdsk command boot process will be back to normal.

So how do I fix a computer that keeps restarting when booting using the windows xp recovery console. The damage is usually caused by a power failure which resulted in damage to the hard drive. Good luck good luck ... :)

Read more


Create a Bootable UBCD4WIN CD to Repair your computer


Have you ever had a problem with computers that you use? I'm sure almost all users of a computer (Windows PC) never experienced it, ranging from damage to your computer can not boot, a virus that destroys up to the vanishing files or data accidentally. If you experience a problem computer damage as above, it's good to try UBCD4WIN CD.
 
 
UBCD4WIN CD is a Windows Recovery CD that is useful for performing troubleshooting various damage to the computer. UBCD4WIN is developed around the year 2004 using pre-installed Bart's technology to create a system of Windows XP that you can lean on the run from a CD or USB.

In addition to the lean and can be run from CD or USB, in UBCD4WIN CD also has included a variety of programs for troubleshooting and diagnosis of various computer problems, repair windows errors, remove viruses, data backup and restore system.

UBCD4WIN contains a variety of applications by category as follows:

1. Anti-Spyware Tools AntiVirus
2. the Applications Tools, Firefox, Opera, PDF Reader, Notepad ++
3. CD Burning Applications, DeepBurner
4. Disk Tools, Backup/Cloning, Defrag, Diagnostic, Partition, Security Management, File Compression, Explorers, Recovery,
5. Linux Tools, Network Tools, Password Tools, Registry Tools System Information Tools, Benchmark Tools, Information & Diagnostic Tools
6. more information can be found at: http://www.ubcd4win.com/contents.htm
 
The last version of UBCD4WIN is UBCD4WIN 3.60 release 269MB-July 13, 2010. For temen-temen who want to try, please download the file at http://www.ubcd4win.com/downloads.htm or directly here

To temen-temen know, UBCD4wIN CD is not our direct download in the form of files.ISO, for example, but this CD we create your own applications with the help of UBCD4WIN. This is because basically the CD using Windows XP operating system that needs to be licensed.

The process of making this UBCD4WIN CD on its own is not difficult, below is the step-by-steps to do:

      Step 1: Install UBCD4WIN on the computer
1. prepare the Windows XP Installer CD.
2. prepare a CD-R is empty
3. run UBCD4WinV360 program and Extrak .exe file that has been downloaded to install it on your computer.
4. by default will create a UBCD4Win folder on drive c.
      2nd step: create ISO image file UBCD4WIN
1. put the CD Installer WindowsXP
2. run the UBCD4WinBuilder program.
3. when there is a question of "Search files" select "No" wrote
4. Specify the location of the Windows installer CD and location to an ISO image
 
5. click the Build and follow the next steps to complete.
 
      3rd step: Mem-burning ISO image file to CD
1. put a blank CD
2. run the memburn program to ISO image, such as Nero, InfraRecorder or CD Burner XP.
3. Burning the ISO file to the CD. UBCD4WinBuilder.
4. complete.

Thus the note about how to make a UBCD4WIN CD Windows Recovery CD is very useful especially for users of Windows XP to perform diagnosis and troubleshooting computer problems. Hopefully is useful ...!!
 

Read more


Linux and Windows 8: Fast Startup are at risk to Data

New features Fast Startup on Windows 8 gave rise to risk on the integrity of the filesystem if other operating systems are used to perform the writing on a Windows partition. Data loss allegedly occurred on a dual boot configuration involving Linux and Windows 8.
 
To avoid data loss and inconsistencies filesystem, users who installed Windows 7 and Linux on the same computer it is advisable to disable Fast Startup that introduced by Windows 7 and active by default. Features Fast Startup creating an issue because the feature does not turn off Windows 8 in full, but directs it in hibernation status specifically--although it looks like a real be booted when revived as all applications have been closed. Keep in mind, the Hibernate feature Fast Startup, Windows 8 will save your Windows session information--such as your cache (cache) that contains the status of the filesystem was last of the FAT and NTFS partitions associated--in image memory is restored during the Fast Startup.

This can lead to data loss when other operating systems is used to do the writing on this partition type easily: once reawakened, which counted off, but it's actually dihibernasikan, Windows will restore your operations with old data and information the filesystem. The risk arises not only when Linux installed on the disc in parallel, but also appear when other access types that differ from the base--such as Windows 7 and Windows PE 3.0 or from the recovery system be booted from a CD or USB Flash Drive.

In the test, the problem may appear when turning off System Windows 8 installed recently (fresh install) from the menu and then create a new file on the Windows partition with Linux distributions. After the sequence of the system (system sequence) starts, the newly created file does not appear in Windows. After removing the catch (unmounted) and associate (remount) partition testing, and after turning off your Windows with restart Windows, the files show up but can not read or corrupted. File edits are also often damaged. Although Windows is able to recover the filesystem system trials, it took up to an hour to fix 1.5 TB NTFS partitions, and a handful of files created or modified with Linux is lost during the process.

This problem is not new. On Windows 7 and older versions of Windows, there are also similar issues but on Fast Startupnya Windows 8 going on continuously considering most people menghibernasi their system without realizing what they really do. It is also potentially a problem when users use the Suspen-to-Disk on Linux and then load a different Linux when hibernation appear, but rare circumstances when the use of the ordinary.

Prevention
The developers of the ntfs-3 g filesystem drivers FUSE which is used widely by most Linux distributions have been aware of this issue since mid-September. Then, they integrate the two modifications to the main development branch of the driver; These changes cause the NTFS partitions can only be associated with a read-only mode (read-only) if the driver detects a Windows system with Fast Startup. This is done with the memeriksaversi ID disk NTFS metadata dri.(1, 2).
 

In fact, there is no release of ntfs-3 g driver new version that incorporates the changes; the last version of ntfs-3 g is almost a year ago. The developers of ntfs-3 g has been doing so, inform the developers of Fedora, which received two of these changes and integrate it on an update driver for Fedora 13.

Debian, openSUSE and Ubuntu, as well as most other Linux distributions have not been included in this update for the sake of providing protection and kernel driver FAT does not detect whether the partition used by Windows systems that enable Fast Startup. Therefore, users who have a dual boot Linux on a PC with Windows 8 smooth always consider precautionary measures. Ntfs-3 g Driver who hasn't been on the patch does not give the user a warning if the hibernation file on the Windows system partition; in fact, the driver is not able to detect whether a system has enabled Fast Startup on the other partition.

Klaus Knopper tells us that Knoppix 7.05 have included patch Fast Startup to ntfs-3 g driver. Also it seems to give the user the option to associate a partition by can-written (writable) and delete the hibernation file so that Windows can do a reload to perfection when the next pemulaian.

It is recommended for anyone who frequently use both operating systems to disable Fast Startup. How, open Control Panel and select the link "Choose what the power button does" under Power Options. Click on the "Change settings that are currently unavailable"; This will expose the panel with more choices where you can turn off the checkbox "fast Turn on startup". Without the features Fast Startup, Windows 8 will take somewhat longer to get started. Full Hibernate Status that can be activated on the same panel should be disabled centangannya, as Windows 8 maintain status information from all the dikatikan filesystem in memory with this option.
Fast Startup setting
With a dual boot system, problems seem to also be prevented by writing the bootloader GRUB 2 on a file instead of on the first sector of the disk system; This file should then bootloader boot configuration is integrated with Windows 8. Start the Linux bootloader through reducing the risk: in this manner, Windows will release the catch him before partition booting different system. The same approach can also be done when a double memboot Windows 7 and 8 in order to avoid problems with this configuration. To do this, use the Windows 7 boot manager; This will occur if Windows 8 installed after Windows 7.

The risk of losing data with Fast Startup or Hibernation does not only occur in mounting Linux/Windows in parallel, but also appeared as a live version of Linux is loaded – e.g. from a USB flash drive, CD or DVD. Users who only occasionally load the Linux system does not need to turn off the feature options Fast Startup as they could load Linux after triggered by livelihood restarted on Windows; This option is only turned off the perfect Windows and allow other operating systems to start safely.

Read more


Connecting two computers with LAN cable UTP

One way to connect two computers is to use the network cable or UTP cable is known. Technique of connecting 2 computers with UTP cable directly in the model network peer to peer or point to point.

menghubungkan 2 komputer dengan kabel UTP

So that both computers can communicate with each other, there are at least three things that we have to do, namely:

Make sure both computers have Network cards that have the driver installed.
Prepare the cable UTP cable with Cross Over. For those who do not know the arrangement of wires cross can read my post about the sequence of the cable UTP Straight and Cross Over.
1. Set the IP Address of the second computer by IP Address is different but with the same subnet. As an example:
2. A computer IP Address: 192.168.1.1 with subnet mask: 255.255.255.0
3. IP Address of computer B: 192.168.1.2 with subnet mask: 255.255.255.0


After the cable UTP Cross Over is installed, the next step is to set the IP Address manually on each computer, here's how the computer with OS Windows XP:

1. click on Start-Control Panel, double-click Network Connections.
2. right-click on the Local Area Connection icon, click Properties
3. in the Local Area Connection Properties window, highlight Internet Protocol (TCP/IP), and then click the Properties button as shown in the picture below:
4. a window will open the Internet Protocol (TCP/IP) Properties, enter the IP Address as in the picture above.
5. Do the same on the other computer. Set with a different IP Address.
To test whether the communication between the two computers is already successful, do PING commands between computers via command prompt, if successful will appear a message like the picture below Repply.

PING antar komputer
If the computer cannot PING each other, checking such as the following:

1. Check the connection cables UTP Cross Over whether is correct
2. make sure the LAN adapters already active (enable)
3. check the IP Address of the second computer, is it one subnet
4 turn off your Firewall or enable (check) the option File and Printer Sharing Exception in Windows Firewall.


If both computers are connected then we can share data between computers or resource such as using printer sharing or short messaging each other over the network. For information about how to share data between computers in a network I will discuss in the next post.

Read more

About This Blog

Auto Backlink

My Blogs

Blog Archive

Followers

Web hosting for webmasters