Tampilkan postingan dengan label Windows. Tampilkan semua postingan

Know Your Hard Drive Specs

When are we going to buy a hard drive, the first thing to do is determine the hard disk specifications we need. General specifications hard drive we can see on the outside of the hard drive (wrap). Examples of hard drive specifications such as "Seagata Barracuda 7200 SATA 500 GB 32 MB Cache Buffer 3.5 inches".

Hard drive specs from the example above, we can see some hard drive specifications that we have to take note of the following:

1. hard drive Type
Is the first hard drive specification we will see. For this there are various types of hard drive such as ATA (IDE), SATA, SCSI and SAS. For an explanation of each of the tpe inidapat hard drive seen in my article "know your type of hard drive".

2. hard drive Capacity
The capacity of the hard drive is a hard drive storage size. Hard drive capacity is the second hard drive specifications that we have to look at when buying a hard drive. Hard drive capacity is currently available in the market is 80 GB, 160 GB, 250 Gb, 500 GB and 1 TB.

3. Form Factor
The third hard drive specification is the form factor, form factor is the physical size of a hard drive that is represented by the midline an used. At the moment it is known two kinds of form factor hard drive, IE the size of 3.5 inches and 2.5 inches.

4. the speed of the hard drive
The speed of the hard drive is basically a measure of the speed of an hard drive to do one lap in one minute so that the stated Rotation Per Minute (RPM). The higher the round this means hard drive konerja the better.

5. the buffer Cache
The last hard drive specifications that we can see in choosing a hard drive is a cache buffer. The buffer Cache is integrated in a memeri hardisk. Cache buffer serves to store data that is requested by the RAM completely, so it does not need to be taken from an. The larger the buffer cache means faster data transfers so that the hard drive will also increase performance.
Untuk bahasa indonesia
indonesia languange:
Ketika kita akan membeli sebuah hardisk, hal pertama yang dilakukan adalah menentukan spesifikasi hardisk yang kita perlukan. Umumnya spesifikasi hardisk dapat kita lihat pada bagian luar (bungkus) hardisk tersebut. Contoh spesifikasi hardisk misalnya "Seagata Barracuda SATA 7200 500 GB Cache Buffer 32MB 3,5 inchi". Dari contoh spesifikasi hardisk diatas, dapat kita lihat beberapa spesifikasi hardisk yang harus kita perhatikan yaitu sebagai berikut: 1. Tipe hardisk Merupakan spesifikasi hardisk yang pertama kita lihat. Untuk tipe hardisk ini ada bermacam-macam seperti ATA (IDE), SATA, SCSI dan SAS. Untuk penjelasan masing-masing tpe hardisk inidapat dilihat pada artikel saya "mengenal tipe hardisk". 2. Kapasitas hardisk Kapasitas hardisk adalah ukuran penyimpanan sebuah hardisk. Kapasitas hardisk merupakan spesifikasi hardisk kedua yang harus kita lihat ketika membeli sebuah hardisk. Saat ini kapasitas hardisk yang tersedia dipasaran adalah 80 GB, 160 GB, 250 Gb, 500 GB dan 1 TB. 3. Form Factor Spesifikasi hardisk yang ketiga adalah form factor, form factor merupakan ukuran fisik sebuah hardisk yang dilambangkan dengan garis tengah platter yang digunakan. Pada saat ini dikenal 2 macam form factor hardisk, yaitu ukuran 3,5 inchi dan 2,5 inchi. 4. Kecepatan putaran hardisk Kecepatan hardisk pada dasarnya merupakan ukuran kecepatan platter hardisk untuk melakukan satu putaran dalam satu menit sehingga dinyatakan dengan Rotation Per Minute (RPM). Semakin tinggi putaran ini berarti konerja hardisk semakin baik. 5. Cache buffer Spesifikasi hardisk yang terakhir yang dapat kita lihat dalam memilih sebuah hardisk adalah cache buffer. Cache buffer merupakan memeri yang diintegrasikan didalam sebuah hardisk. Cache buffer berfungsi untuk menyimpan data yang sring diminta oleh RAM, sehingga tidak perlu di ambil dari platter. Semakin besar cache buffer ini berarti transfer data akan lebih cepat sehingga kinerja hardisk juga akan meningkat.

Read more


Fix The Computer Restarts While Booting


windows recovery console imgOh yes, for temen-temen who have yet to figure out what it was windows xp recovey console can read my post about accessing windows xp recovery console, the windows xp recovery console command line and how to repair damaged windows with the recovery console, hopefully some discussion of that article can give a little description of the windows xp recovery console.

Well, for the case I encountered yesterday was a computer restart shortly after boot or start up a computer so that it can't get into the next process that start up windows xp. Error message that appears more or less as follows:

"We apologize for the inconvenience, but windows did not start succesfully. A recent hardware and software change might have caused this .... "and then below we are told to choose boot in a manner as follows:

1. Safe Mode
2. Safe Mode with networking
3 Safe Mode with command prompt
4. the Last known good configuration, and
5 Start Windows Normally

By selecting Last known good configuration is usually windows can start up normally, but if the damage was severe enough for example there is damage on the master boot record, boot sector or file structure hard drive, the computer will restart again. The steps that we can do is try to fix the hard disk with the windows xp recovery console, follow the steps:

1.Set the BIOS to boot first made computer via cd/dvd rom drive.
2.Windows XP setup CD input, and let it start up process is running from a CD
3.The display appears after the "Welcome to setup" as shown below, press "R" to access the windows xp recovery console
windows xp recovery console image
4. Type the number 1 and the windows administrator password (windows klo ga dipassword aja, press enter) on the display as follows:
mengakses windows xp recovery console 
 
5. To repair a corrupted boot sector of partition type fixboot command: C:
fix boot sector windows xp
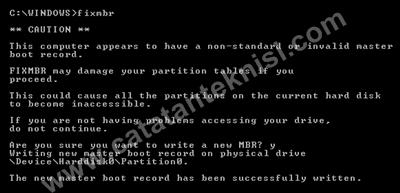
6. To fix the master boot sector (mbr) damaged type command: fixmbr
fix master boot record windows xp
7. to repair the bad sectors, lost clusters, cross-linked files, and directory errors that damaged type command: chkdsk c:/r as I discussed in the article how to fix hard drive.
8. Furthermore, to exit from recovery console type the command: exit
9. Normally, after checking and repair hard drive with chkdsk command boot process will be back to normal.

So how do I fix a computer that keeps restarting when booting using the windows xp recovery console. The damage is usually caused by a power failure which resulted in damage to the hard drive. Good luck good luck ... :)

Read more


Linux and Windows 8: Fast Startup are at risk to Data

New features Fast Startup on Windows 8 gave rise to risk on the integrity of the filesystem if other operating systems are used to perform the writing on a Windows partition. Data loss allegedly occurred on a dual boot configuration involving Linux and Windows 8.
 
To avoid data loss and inconsistencies filesystem, users who installed Windows 7 and Linux on the same computer it is advisable to disable Fast Startup that introduced by Windows 7 and active by default. Features Fast Startup creating an issue because the feature does not turn off Windows 8 in full, but directs it in hibernation status specifically--although it looks like a real be booted when revived as all applications have been closed. Keep in mind, the Hibernate feature Fast Startup, Windows 8 will save your Windows session information--such as your cache (cache) that contains the status of the filesystem was last of the FAT and NTFS partitions associated--in image memory is restored during the Fast Startup.

This can lead to data loss when other operating systems is used to do the writing on this partition type easily: once reawakened, which counted off, but it's actually dihibernasikan, Windows will restore your operations with old data and information the filesystem. The risk arises not only when Linux installed on the disc in parallel, but also appear when other access types that differ from the base--such as Windows 7 and Windows PE 3.0 or from the recovery system be booted from a CD or USB Flash Drive.

In the test, the problem may appear when turning off System Windows 8 installed recently (fresh install) from the menu and then create a new file on the Windows partition with Linux distributions. After the sequence of the system (system sequence) starts, the newly created file does not appear in Windows. After removing the catch (unmounted) and associate (remount) partition testing, and after turning off your Windows with restart Windows, the files show up but can not read or corrupted. File edits are also often damaged. Although Windows is able to recover the filesystem system trials, it took up to an hour to fix 1.5 TB NTFS partitions, and a handful of files created or modified with Linux is lost during the process.

This problem is not new. On Windows 7 and older versions of Windows, there are also similar issues but on Fast Startupnya Windows 8 going on continuously considering most people menghibernasi their system without realizing what they really do. It is also potentially a problem when users use the Suspen-to-Disk on Linux and then load a different Linux when hibernation appear, but rare circumstances when the use of the ordinary.

Prevention
The developers of the ntfs-3 g filesystem drivers FUSE which is used widely by most Linux distributions have been aware of this issue since mid-September. Then, they integrate the two modifications to the main development branch of the driver; These changes cause the NTFS partitions can only be associated with a read-only mode (read-only) if the driver detects a Windows system with Fast Startup. This is done with the memeriksaversi ID disk NTFS metadata dri.(1, 2).
 

In fact, there is no release of ntfs-3 g driver new version that incorporates the changes; the last version of ntfs-3 g is almost a year ago. The developers of ntfs-3 g has been doing so, inform the developers of Fedora, which received two of these changes and integrate it on an update driver for Fedora 13.

Debian, openSUSE and Ubuntu, as well as most other Linux distributions have not been included in this update for the sake of providing protection and kernel driver FAT does not detect whether the partition used by Windows systems that enable Fast Startup. Therefore, users who have a dual boot Linux on a PC with Windows 8 smooth always consider precautionary measures. Ntfs-3 g Driver who hasn't been on the patch does not give the user a warning if the hibernation file on the Windows system partition; in fact, the driver is not able to detect whether a system has enabled Fast Startup on the other partition.

Klaus Knopper tells us that Knoppix 7.05 have included patch Fast Startup to ntfs-3 g driver. Also it seems to give the user the option to associate a partition by can-written (writable) and delete the hibernation file so that Windows can do a reload to perfection when the next pemulaian.

It is recommended for anyone who frequently use both operating systems to disable Fast Startup. How, open Control Panel and select the link "Choose what the power button does" under Power Options. Click on the "Change settings that are currently unavailable"; This will expose the panel with more choices where you can turn off the checkbox "fast Turn on startup". Without the features Fast Startup, Windows 8 will take somewhat longer to get started. Full Hibernate Status that can be activated on the same panel should be disabled centangannya, as Windows 8 maintain status information from all the dikatikan filesystem in memory with this option.
Fast Startup setting
With a dual boot system, problems seem to also be prevented by writing the bootloader GRUB 2 on a file instead of on the first sector of the disk system; This file should then bootloader boot configuration is integrated with Windows 8. Start the Linux bootloader through reducing the risk: in this manner, Windows will release the catch him before partition booting different system. The same approach can also be done when a double memboot Windows 7 and 8 in order to avoid problems with this configuration. To do this, use the Windows 7 boot manager; This will occur if Windows 8 installed after Windows 7.

The risk of losing data with Fast Startup or Hibernation does not only occur in mounting Linux/Windows in parallel, but also appeared as a live version of Linux is loaded – e.g. from a USB flash drive, CD or DVD. Users who only occasionally load the Linux system does not need to turn off the feature options Fast Startup as they could load Linux after triggered by livelihood restarted on Windows; This option is only turned off the perfect Windows and allow other operating systems to start safely.

Read more


How to create ISO image files in Windows 7

good evening all, I apologize for posting an that is not up to date, as due to busyness.
ok ...now I will share a few tips for you yaiut how to create ISO image file of Windows 7.

In a note on the "how to install Windows 7 from USB Pendrive" use the Windows 7 USB/DVD Download Tool, we need the installer files from the Windows 7 operating system in the form of ISO image file. Then how klo we only had windows 7 source in the form of pieces of DVD? Calm aja, in this occasion we will try to create a windows 7 ISO image file from the DVD Installer.

To create ISO image file from the Windows 7 DVD, we need the help of software such as ImgBurn. ImgBurn is a freeware application for burning CDs, DVDs, HD DVDs and Blu-ray. ImgBurn has several main features, namely:

Read-Create image file from disc
Build-Create an image file from files on your computer or network-or you can write the files directly to a disc
Write-Write an image file to a disc
Verify-Check a disc is 100% readable.
Discovery-Put your drive/media to the test!

To make ISO file from DVD Windows 7 this we will use the Read mode (create image file from disk). The following the steps:

1. Download first file ImgBurn here
2. To Install and run the program ImgBurn to window appears as below:

create image file from disk 


3. Click on the button Create image file from disc
4. Select the Source (DVD) and the Destination (the location and file name.The ISO will we make).

create image file from disk

5. Then click the button Read, to begin the process of creating the ISO file.
6. Wait until the process is complete and the notification window will appear "Operation Successfully Completed!"

Now we have a file (image.ISO DVD files) from Windows 7. In addition to making the Windows 7 installer from USB, ISO image file can also be used as a backup from the Windows 7 DVD we have.

Read more


Windows 8 Start Screen Customizer v1.0

Windows 8 Start Screen Customizer v1.0, this application serves to change the default display background in windows 8, the following features in this application.
Screenshot


Features :

  1. Change the background image on the Screen Star Windows 8
  2. Change the number of rows of tiles on the screen star Windows 8
  3. Adjust the transparency/opacity to the Start Screen and tile
  4. Set Desktop wallpaper as a background on the screen Star
  5. Arrange multiple images as a background slideshow on the screen Star 
 LINK DOWNLOAD

Donwload With Sharebeast

Read more


Download Modern UI Start Screen Windows 8

Download Modern UI Start Screen Windows 8, cara mengganti background start screen windows 8, merubah background start screen windows 8 -


Modern UI Start Screen merupakan sebuah software yang berfungsi untuk merubah atau mengganti background start screen pada windows 8. dengan adanya Modern UI Start Screen kalian dapat merubah background start screen dengan foto-foto yang anda inginkan, misalkan foto pemandangan atau foto anda sendiri, itu semua terserah kalian?. yang terpenting Modern UI Start Screen tidak di dukung untuk OS windows 7, dengan kata lain tidak dapat di operasikan, karena hanya di khusukan untuk Windows 8.


  LINK DOWNLOAD

Download Via Sharebest
Download Via Mediafire

password jika butuh : apricyber Terima Kasih atas Kunjungan dan Jangan lupa komentar anda.

Read more


Instal Windows 8 Pake USB FlashDisk

Selamat malam agan-agan dan sista-sista,ane baru pulang jalan sama Cewek langsung mosting sebuah Tips gimana cara

Bila beberapa hari yang lalu saya sudah share windows 8 pro, pada kesempatan kali ini saya akan mencoba berbagi pengalaman bagaimana cara menginstall windows 8 via usb flashdisk. Simak step by stepnya berikut ini,,

Untuk menginstall windows 8 via usb flashdisk saya tidak menggunakan aplikasi pihak ketiga, hanya menggunakan aplikasi bawaan windows yang serba bisa, yakni command prompt. Berikut langkah demi langkahnya :

Cara Install Windows 8 via USB Flashdisk Dengan Mudah :

  1. Pastikan USB Flashdik anda memiliki kapasitas yang cukup untuk menampung file-file windows 8. Saya menggunakan flashdisk 8 Gb.
  2. Colok flashdisk ke laptop/komputer.
  3. Buka command promnt, caranya tekan tombol Win+R. Lalu ketik CMD, enter.
     4. Masuk ke dalam aplikasi command prompt kan?? Ketik diskpart, enter.
     5 .Ketik list disk, maka akan muncul media penyimpanan di komputer anda, pastikan anda tahu    betul yg mana flashdisk anda. Untuk mngetahuinya, cukup liat kapasitas size nya aja. Posisi flashdisk saya ada di disk 2, maka ketik select disk 2.


  1. Ketik clean, enter. Lalu ketik create partition primary, enter.
  2. Ketik select partition 1, enter. Ketik active, enter lagi.
  3. Ketik format fs=fat32, enter.
  4. Ketik assign, enter.
  5. Terakhir, ketik exit, dan enter.
Sekarang kita sudah selesai tahap awal menyiapkan flashdisk yang akan kita gunakan, selanjutnya ialah tahap copy dan paste file-file windows 8 nya. Copy semua files windows 8 yang ada di dalam DVD kemudian paste di flashdisk anda. Selesai, kini flashdisk anda sudah siap digunakan untuk Install Windows 8.

Read more


Membuat “Picture Password” Pada Windows 8

Tadi saya baru share Sebuah infor dimana Microdoft Patenkan Windows 8 Picture password
,Arti nya di windows 8 anda bisa membuat password komputer dengan picture Password.Dan sekarang saya mau kasih tau langkah-langkah Membuat Picture Paswword untuk anda semua..
nginkan mudah saja langkah nya

  1. pergi ke "more pc setting"  di ujung kiri bawah layar anda.
more


    2.  lalu klik "user" dan "create a picture password"
pp

  3. Choose(masukkan) you Picture and Use this Picture .
4. Pada tahap ini, silahkan memberikan tanda pada gambar tersebut. Untuk menandai, anda dapat menggunakan cara melingkar, atau garis lurus.Disini saya memilih untuk garis lurus. Lalu klik Start Over.


 Ctt : Setelah anda melewati tahap ini dengan 3 kali dan di ulang sekali lagi untuk confirmasi password anda.
Oh ya, Windows 8 tetap menyediakan cara masuk ke Dekstop dengan Password character. Tinggal Switch Account aja.
Done!.


password jika butuh : apricyber Terima Kasih atas Kunjungan dan Jangan lupa komentar anda.

Read more

About This Blog

Auto Backlink

My Blogs

Blog Archive

Followers

Web hosting for webmasters