There are many ways that we can do to prevent data-the data contained on a USB Pendrive is not accessible by others. Other
than through file encryption on Flash as it has been described in a
previous post, we can also use the program that serves as a data
protection tools for USB Pendrive. One of the programs to protect data on a USB Pendrive I have ever used is the USB Flash Security ver 2.1.1.

1. This program is used to Download site http://www.kashu-sd.co.jp/en or alternative download here
2. Do
data backup in advance all of the USB Pendrive to the USB hard drive,
because the Flash will be reformatted when the program is installed into
Flash.
3. Install USB Flash Security program to the hard drive.
4. Run the program by clicking on Security USB Flash USB Flash Security icon on your desktop.
5. Flash input that will be protected, Flash will automatically be detected.
6. Select the USB flash drive as RAM Tab will be protected. Click the install button to start the process of installing the program on a Pendrive. All data on the USB flash drive will be deleted (see the image above)
7. Input the password to access the Pendrive. Caution do not forget them.
8. Click OK to perform the installation of USB Flash Security to Pendrive. Wait until it is finished.
9. When you are finished, on a USB Pendrive would file UsbEnter.
10. Run the .exe UsbEnter by clicking twice on the file.
11. Input a Password which we have previously set to turn on system protection on a USB Pendrive. A progress indicator appears, wait until it is finished.
12. In
the windows explorer window we can enter into a USB Flash drive (for
example, drive E:) and enter all the data we have into it.
13. Once that is done we can unplug our USB on the computer, by first updating the USB eject Flasdisk us in Windows Explorer.
Now USB Flasdisk we have successfully protected, so every time we will access the Flash we have to enter the password first.
Tips
on choosing a USB Pendrive this deliberately I wrote for mere sharing
of experience in selecting a USB Pendrive would we buy. Just
be advised of some of my experiences and some USB flash drive as RAM in
buying temen, sometimes end up with a bad story, ranging from
speed-write medium (copy of data) up to a slow Flash unreadable and
corrupted Flash (dead-total) at all.
Some
damage as Pendrive Pendrive which read 0 bytes, pendrive error and some
other pendrive damage still can be fixed by using a software to repair
pendrive. But data stored in it sometimes can not be saved. For it to be keen on picking USB Flashisk before deciding to buy it.

flash disk
The following are some tips in choosing a USB Pendrive would we buy:
1. USB flash drive Brand
Specify
the Flash brand whose primary purpose is related to the quality,
standardization of products, software support, warranty and after-sales
service of the pendrive. Many over the counter brand Flash available such as: ADATA, KINGSTON, TRANSCEND, HP, NEXUS, PENDRIVE, SANDISK, and many more.
To
find brands that have a reputation of "good" in terms of quality and
service, we can look for tau on the internet such as through forums,
blogs and sites selling online, here we choose the most selling or much
reviewed and recommended others. Then we're looking for the official website to have a look at the features and services available.
2. storage capacity
Regarding the capacity of peyimpanan this Pendrive I have stories from the experience of a friend. This
time he bought a Flash online Flash with a capacity of 250 GB is priced
at Rp 150.000,-which in my opinion is very cheap for a capacity of it,
and I will in the liver can only say "Childr it seems fake and will not
last long". True enough in just a matter of weeks, the Flash has since been stopped garbage.
From the story above, I just want to say that we must be wise in determining the capacity of the Flash shall we buy. As
seen from its function as a medium of Exchange data, then the capacity
of the Flash certainly does not need to be too big and in fact any Flash
capacity could have been "cheated". Pendrive 2 GB size-4 GB in my opinion is enough to store temporary files.
3. the speed of data Transfer.
Data transfer speed is the speed that Flash to read data and store the data. A data read speed is usually higher than the speed of saving.
This data transfer speed will be decreased if using a USB cable or a USB hub. To check the data transfer rate of USB Flash application, we can use USB Flash Benchmark from usbflashspeed.com.
4. materials and form Casing for childr
In
addition to factors of art matters in my opinion of the material and
the shape of the casing is its design must be sturdy and able to protect
the Flash from the collision when falling for example. I myself prefer Flash casing made from rubber.
5. Security Features
For
those of you who want to save important data in Flash, it's good to
choose a Flash Disk that has features such as hardware security
encryption on USB Flash Disk Security NETAC and IronKey. But the price of flash disk of this type is quite expensive. To
add encryption on flash disk temen-temen could use data protection
software on the flash disk, use file encryption application TrueCrypt or
use.
6. pay attention to the authenticity Factor Flash Disk
Things
that we should pay attention to in choosing Flash next factor is the
authenticity of the (original) from the flash disk itself. In
order for the flash disk is that we buy pendrive original, it's good we
buy flash disk from trusted stores and do not easily tempted by cheap
prices on offer. Read more tips for choosing Flash falsu and the original can be viewed here.
So some simple tips how to select the flash disk. Hopefully it is useful.
At
first each of those files are written to a hard drive in a location
that is neatly arranged/each other, there is no free space (blank space)
between those files. As time goes by, not only
the files just kept filling up the hard drive, but it occurs also
changes on the old files, be increased, diminished even erased.
The
impact of these activities lead to a condition in which the placement
of these files does not neatly arranged again, where often there is
empty space because the data are erased and the placement of new pieces
of irregular file again. This causes the storage space on the hard disk used in inefficient and can reduce storage capacity. This is commonly referred to by the term "fragmentation on the hard drive".
Fragmentation on the hard drive it is natural and unavoidable. But
the impact of this fragmentation of the hard disk can cause the
computer runs very slowly because there's extra time to "find" the
location of several pieces of files scattered squiggly.
How to troubleshoot hard drive Fragmentation
In
order to overcome the fragmentation of the hard drive, all we have to
do obviously is to reorder the back files that are stored in a squiggly
termed "hard drive defragmentation". Simple illustration about the fragmentation and defragmentation of the hard drive can be seen in the picture below:

fragmentation and defragmentation of the hard drive
As
seen on the pictures, initially for terseusun files to mess with, then
once there are additions to the file first, then hard drive
fragmentation will occur. By running a defragmentation of the hard drive the files are arranged back to mess with.
To
perform a defragmentation of the hard drive we can use the built-in
windows Tool or use some third-party applications like defragler and
mydefrag.
Here's how to run the hard drive defrag tool can also be bawaaan on windows 7:
- Click Start-All Programs-Accessories-System Tools-Disk Defragmenter.

- defragmentation of the hard drive in windows 7
- Click Analyze to see how many percentage of fragmentation on the hard drive
- Click Defragment to begin the Disk defrag the hard drive.
Where necessary we can also schedule defragmentation of the hard drive and click the Configure schedule ...

As the owner of a computer of course we wanted a computer that we use is always in optimum condition. But
sometimes we don't care about the "health" of our computers, we use
every day but we never care so that the day our computer is getting
slow, unstable even frequent crashes.
In
this article I'll share simple tips about the 5 easy steps to optimize
your computer system in order to keep performance optimal.
1. clean the Windows Registry
To
clean the registry of this fact we can do this manually by deleting the
registry key that is not necessary, but surely this method is not
efficient. For it how to clean the windows
registry the easiest is to use the help of software as for example which
I often pake IE Wise Registry Cleaner.
2. Update Hardware Drivers
Drivers
that do not fit or are already obsolete (outdated) can cause a device
can't communicate well with other computer system so that could be
causing your computer to run slowly and unstable (often hang or crash). For that we need to constantly renew the drivers your computer by means of a mengupdatenya on a regular basis.
An easy way to update the drivers it needs is to use the help of software such as Driver updates with DriverEasy.
3. Wipe the hard disk from junk files.
Junk
files like the rest of the installation, temporary internet files,
history files, error logs and so on can slow down your computer's
performance. Therefore always make the files this garbage on a regular basis. To clean these files I think it is enough to run a disk clean-up tool default windows.
To
run a disk clean-up in windows 7, click the Start button, type: cleanup
on the Search programs and files, and then select the hard drive to be
cleaned.
4. Defrag hard drive
Do a defrag hard drive can optimize the computer system significantly. Therefore
do defrag the hard drive on a regular basis or after performing data
modification, such as installation programs and removing or adding a big
file. To do a defrag hard drive we can do it
with the default tool windows such as in the posting on how to defrag
the hard drive in windows 7 or using the help of other software such as
smartdefrag or defragler.
5. Clean your computer from Malware
Viruses, Spyware, Trojans are types of malware that can attack and damage to the computer system. Use Antivirus always updated to fortify your computer from any malicious programs. It's
good we always keep the computer in a way to avoid the malware, but if
your computer is already infected with a virus and other malware, use an
application such as malwarebyte is to clean up the malware or download
scan computer offline by using an antivirus rescue disk from a variety
of vendors such as antivirus AVG Rescue Disk.
on
the internet we certainly know what is a good online storage, it's like
4shared, mediafire, sharebest and many more of her as you can find on
the internet.
However
at this time precisely Tuesday, April 24, 2012 official Google
yesterday launched Google Drive, a media to peyimpanan and share your
files online-based cloud computing. For gratisnya service Google Drive gives us a space of 5 GB. While for Google berbayarnya Drive peyimpanan space serves up to 16 TB.
LIST GOOGLE DRIVE
1. to enjoy Google services Drive we need to log in to our gmail account here
2. you will be taken to the My Drives window, which is where Your files will be stored. If
you previously had a document in google docs, then the files that have
been created via google doc will be there in My Windows Drive.

3. my drive-google drive
In
the window My this Drive we can directly create documents (use the free
google docs) and press the button Create or upload documents from your
computer by pressing the symbol of hard drive (storage).
USE GOOGLE DRIVE IN YOUR COMPUTER
1. you can also download Google applications Drive for PC. With this application we can easily synchronize files on our computers to the storage space on My Drive.
2. once didonwload, install and run Google applications Drive for PC, after installed then login with your gmail account.
3. Once logged in, on the first time used will be shown a window like below:
4. advanced setup google drive
5.
by default Google Drive folder on your computer with the operating
system windows 7 will be stored in the folder "C:\Users\nama_user\Google
Drive". To specify a different location, click Advanced setup button wrote.
6.
once the process is finished, the folder location settings then we just
drag n drop aja files which we will save to Google Drive through that
folder.
Some
of the advantages of Google Drive is integrated with Google Docs and
allows users to access files or documents from anywhere and work on
documents with colleagues in the same time. The
user is also no need to bother installing a lot of software, because
Google Drive allows all sorts of file types, such as files with the PSD
format (photoshop) or HD videos are opened via browsers (e.g. Google
Chrome).
For
you who are interested in meyimpan file for this drive onlie with
google, currently Google Drive is available for computers with the
Windows operating systems and Mac, smartphone and Android tablet. From
the description on the official Google Drive, search engine companies
this will make Google iOS-based devices for Drive, i.e. iPhone, iPad and
iPod Touch.
How
to Reset the BIOS of the Motherboard of this computer is one of the
basic steps that were often performed in the process of computer repair.
Although I'm sure most readers of this blog
already know catatanteknisi how do I reset the computer BIOS, but ga is
no harm I wrote back in record time.
Though
seem trivial, but the steps to reset the BIOS incorrectly can cause the
motherboard BIOS or other components are damaged, at least that's what I
had ever experienced. Here are the steps how to
reset the correct BIOS I quoted with some changes from the article how
to Reset the BIOS Chip magazine Edition 02/2012.

The steps how to Reset the computer BIOS:
Make sure your computer is not connected to the power source. This
can be done by unplugging the power from kobel stop contacts and also
unplug the power supply (24-pin power cable) from the computer's
motherboard.
Wait a few moments to make sure the electricity has been lost. To accelerate the loss of (waste) of electric current on the motherboard, we can press the power button on the computer.
Search button or jumper labeled CLR CMOS. For this there is a jumper that consists of a 3 pin and 2 pin. To clear CMOS or BIOS reset, press the reset button. For
which type of jumper 3 pin, move the position of the other side while
the jamper type 2 pin jumper, then we stayed the second pin menjumper,
klo the difficulty of finding a standard jumper, just use a screwdriver
to the menjumper pin. The bottom line is that both pins to be connected (short). Let a few seconds in that position.
After
that move the back position of the jumper to its original position for
the pin type 3 or type 2 to disconnect the jumper pin. Input cable power supply motherboard. Make sure all terangkai correctly then that connects your computer to electric PLN.
Restart the computer. When the BIOS reset BIOS settings then successfully will return to its original position. And
in the case of damage to the computer is not booting, the BIOS after at
reset, usually the computer will be able to boot back up.
When you reset the BIOS did not work, redo steps 1-2, then unplug the battery BIOS and redo step 3-5.
If
managed well, repeat 1-2 steps back, disconnect all power supply cables
on the motherboard off battery, BIOS and Memory (RAM) your computer. Repeat steps 3-5.
The
final step to reset the BIOS in a way above have not managed well are
back did steps 1-2, then off all the components on the motherboard,
Processor, RAM and other additional Cards as VGA card. clear the
returned motherboards from dirt and repeat step 3 above, this time used
to let stand for 30 minutes. Then repeat steps 3-5.
Thus the steps how to reset the BIOS on the motherboard of the computer. Good luck ...
How to combine multiple pdf files? There are times when we need to merge multiple pdf files into one pdf file. Suppose
for temen-temen who have downloaded the free materials for example on
English language courses from belajaringgris.net then there is material
in the form of pdf files created separately, one pdf file for each
chapter.
Advantages
of combining multiple pdf files into a single finger is that we can
combine the separate materials into one file only and of course to make
it easier when we want to print the whole of such content.
To
combine multiple pdf files we need the help of software such as PDFsam,
an opensource application which can combine multiple pdf files into one
pdf file only and also does the reverse, namely split one pdf file into
several pdf files.
Here's how to combine pdf files use pdfsam:
1. Download pdfsam here
2. Install and run the application to pdfsam window appears as follows:
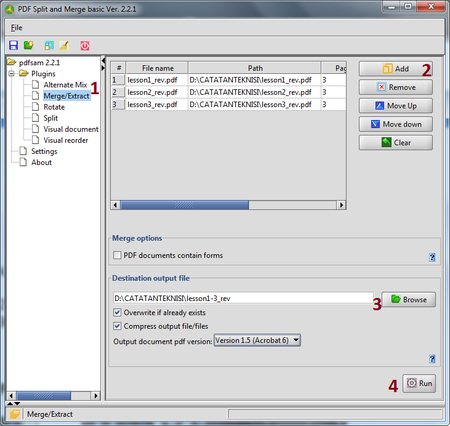
3. free pdf split and merge
4. click the Merge/Extract (No. 1)
5. click the Add button (No. 2) and add the pdf files that are about to merge.
Specify the folder where the file storage results (output file) (No. 3)
6. Finally click the button Run (No. 4) to begin the process of merging pdf files.
In addition to using application pdfsam, to combine multiple pdf files we can also use other applications include:
1. the PDFill PDF Tools
In
addition to combine pdf files, this application PDFill PDF Tools can
also perform encryption, reformat pdf pages, add information, header,
footer, watermark, etc.
2. a PDF Binder
The application is very simple to combine pdf files.
3.
Combining pdf files online, simply visit www.pdfmerge.com, upload
multiple pdf files and file merger can be didonwload directly.
Thus the number of ways to combine pdf files, if the file shall we merge not formatted.PDF, we can change the first file into pdf format with the help of the application free pdf converter.
good evening all, I apologize for posting an that is not up to date, as due to busyness.
ok ...now I will share a few tips for you yaiut how to create ISO image file of Windows 7.
In
a note on the "how to install Windows 7 from USB Pendrive" use the
Windows 7 USB/DVD Download Tool, we need the installer files from the
Windows 7 operating system in the form of ISO image file. Then how klo we only had windows 7 source in the form of pieces of DVD? Calm aja, in this occasion we will try to create a windows 7 ISO image file from the DVD Installer.
To create ISO image file from the Windows 7 DVD, we need the help of software such as ImgBurn. ImgBurn is a freeware application for burning CDs, DVDs, HD DVDs and Blu-ray. ImgBurn has several main features, namely:
Read-Create image file from disc
Build-Create an image file from files on your computer or network-or you can write the files directly to a disc
Write-Write an image file to a disc
Verify-Check a disc is 100% readable.
Discovery-Put your drive/media to the test!
To make ISO file from DVD Windows 7 this we will use the Read mode (create image file from disk). The following the steps:
1. Download first file ImgBurn here
2. To Install and run the program ImgBurn to window appears as below:

3. Click on the button Create image file from disc
4. Select the Source (DVD) and the Destination (the location and file name.The ISO will we make).

5. Then click the button Read, to begin the process of creating the ISO file.
6. Wait until the process is complete and the notification window will appear "Operation Successfully Completed!"
Now we have a file (image.ISO DVD files) from Windows 7. In
addition to making the Windows 7 installer from USB, ISO image file can
also be used as a backup from the Windows 7 DVD we have.
About This Blog