For getting a lot of traffic, just call it 1,000,000 or hundreds of lah, it is not so difficult. I will describe to you here. Among them are:
* Expand the articles in your blog. You can prove it yourself. Blog-heavy
blog traffic/visitors, because they've got an awful lot of articles,
until you reach the above 300, 400, and 500 articles. Then perbanyaklah write articles, because the quantity is also important. If you can't produce a quality article could also be copy-paste. But do it all the copy-paste. Try posting to the sentence itself, don't slavishly cut-paste from another article.
Tips for blog posts that are true:
If you don't have an idea, then see someone else's article. Then
arrange it yourself your own wording with the words let not-so-known
jiplaknya and not as duplicate contents terdetect by Google. However don't forget if the idea comes from the articles of others then mentioned his link. Show that you are a blogger who know gratitude and dignity and want to specify the URL of the blog link.
* Get the alias often blogwalking (walk in to someone else's blog and leave a comment). Don't become a blogger if you want to have a lot of males visitors. Bloggers
should often itinerant, said another blogger and comment that it stuck
in her blog, do every day that this was possible. A
lot of bloggers who trafiknya high had it not been for donations of
Google or Yahoo, but because she's a diligent Blogwalking. Including you come here, it's walking blog name. Don't forget and remember Yes, berkomentarlah!
Quick Tips: make list blogwalking blog-blog you visit let me easily to visit again. Or you can use your blog link exchange box. Enter your list of friends-friends who frequent blog and blogwalking active to be able to reply to visit your blog.
* Submit to web directories. Here
I provide a list of blog directories which process is very easy, and
most of them straight to approve of our blog in just minutes. Here's the list:
http://www.freeweblinkdirectory.info
http://www.linkforfree.com.ar
http://www.starsdirectory.com.ar
http://www.mywebdirectory.com.ar
http://www.linkdirectory.com.ar
http://www.submitlink.com.ar
http://www.simpledirectory.com.ar
http://www.monsterdirectory.com.ar
http://www.vipdirectory.com.ar
http://www.fastdirectory.com.ar
http://www.alldirectory.com.ar
http://www.redlavadirectory.com.ar
http://www.gardendirectory.com.ar
http://www.seofriendly.com.ar
http://www.linkorama.com.ar
http://www.newfreedirectory.com.ar
http://www.sitiosmardelplata.com.ar
http://www.paginasenargentina.com.ar
http://www.argentodo.com.ar
http://www.mdpwebs.com.ar
http://www.websenargentina.com.ar
http://www.goldenlinks.com.ar
http://www.yourlinkhere.com.ar
http://www.000directory.com.ar
http://www.addnewlink.com.ar
http://www.freewebdirectory.com.ar
http://www.seodirectory.com.ar
http://www.weblister.com.ar
http://www.addyourwebsite.com.ar
http://www.megalinksdirectory.com.ar
http://www.linknow.com.ar
http://www.reciprocaldirectory.com.ar
http://www.newconceptdirectory.com.ar
http://www.submityourlink.com.ar
http://www.namedirectory.com.ar
http://www.directorylist.com.ar
http://www.noreciprocal.com.ar
http://www.morevisits.com.ar
http://www.backlinkpower.com.ar
http://www.power-backlink.com.ar
http://www.blpdirectory.info
http://www.ncdirectory.com.ar
http://www.submitsitenow.info
http://www.ukdirectory.com.ar
http://www.linkshere.com.ar
http://www.newconceptdir.com.ar
http://www.linksheaven.com.ar
http://www.prdirectory.com.ar
http://www.freebacklink.com.ar
http://www.powerdirectory.com.ar
http://www.directorymaster.com.ar
http://www.monsterbacklink.com.ar
http://www.websitelist.com.ar
http://www.welcomelinks.info
http://www.directorync.com.ar
http://www.beastdirectory.info
http://www.speedydirectory.info
http://www.addsitenow.info
http://www.subseo.info
http://www.sundirectory.info
http://www.linkdirectorysite.info
http://www.10directory.info
http://www.fastapprovals.info
http://www.thegeneraldirectory.info
http://www.forlinks.info
http://www.directorynow.info
http://www.directorysyndicate.info
Set the stage way ya list. For example, to submit in a day 3 or 5 directory. When to submit blog to select Directory FREE SUBMIT without RECIPROCAL. And if you have any other directory you can add in the comments field
* Submit blog to dofollow social bookmark. This is her address, and everything was proven to be able to boost blog traffic. Moreover, if able to write unique things, interesting, warm and others. A lot of bloggers and webmasters are using dofollow social bookmark to make the blog popular. This list is
http://digg.com
http://hatedorloved.com
http://pixelmo.com
http://socialogs.com
http://www.business-planet.net
http://swik.net
http://www.folkd.com
http://www.mecozz.com
http://linkatopia.com
http://www.quadriot.com/
and Indonesia: Dofollow Social Bookmark
http://lintasberita.com
http://infogue.com
Tips to submit blog to social bookmarks: Please submit to 12 social bookmark above for each article that you just publish. Can it help me? Benefits of course so that your new article into the Google index and get traffic. Imagine
if your blog has 1 article 12 backlinks from Social Bookmarks, so if
you have 100 articles on the blog then it already had 1200 backlink WOw.
Superb khan?
* Build internal links. While writing the post, I recommend to build internal links. Internal link building links that point to your postings.
Benefits of internal links follow:
1. If your post has not yet been indexed or missing from Google, can be indexed again this way
2. and also the post Gets a free link.
3. Give the info to the reader that such posts exist.
4. make the Reader blog/pengunjung be interested in reading a lot longer.
Do the above tips as often as possible.
* Submit to article submission. My advice use Goarticle.com services and Qassia.com because the process is super easy.
* Create dummi blog, if it can be as much as possible. Dummi blog is the blog fool whose job only give you backlinks to your main blog. And input your blog address there is also feednya.
* Frequent-often post topics of rame, warm and actual. As is the case of the 2012 Apocalypse yesterday or problems of Palestine and Israel War barbaric. This way is also an effective way to bring traffic blog.
* And if it had more money, buy/modal links buy Reviewmu and review or anywhere.
* Create a review for other bloggers and blog link when you call the write posts, to establish a friendship with him. So the next time you got a reply, let alone review the blog have berjibun visitors is very profitable.
* Be a blogger who is accommodating and friendly and be great as a place to ask.
* Learn to write well and communicative, because blogging is writing activities.
*
Be a blogger who is sensitive to the social conditions, if there are
any issues that occur either on the internet or in the real world, then
head to comment on it or post but wisely and clever. It is great to attract the masses.
*
Don't so bloggers who knowledgeably and sok good, if it turns out that
you are knowledgeably then lowers the sense of trust that their visitors
are reluctant to pay again.
*
Make the ngeflame post, these tips aren't too I recommend but its quite
potent for increasing traffic, a sample post ngeflame like some huge
ruckus last month between a blogger Blogspot with a WordPress user. Its negative effects, your blog could be branded a fuss and resek.
* Submit also your blog to the social network, submit it to 2 social network that dofollow:
1. www.zimbio.com/(for example: http://www.zimbio.com/account/articles
2. http://www.squidoo.com (e.g.: squidoo)
Of the 16 above the most tips I recommend is to point 3:
1. Article Banyakin
2. Submit each article to social bookmarking
3. Blogwalking.
Hopefully
after you use the technique above, your blog can be a lot of visitors,
if you are able to do all that, then of course be faster up her rank in
google search engine aka the better.Never thinking chestnut high if no effort.

How to choose keywords or keywords that are right for the blog? Do not look lightly on this issue. This is the artery of traffic on the blog brother. Choose the wrong keyword, then the SEO optimization and sisters will is very heavy. So please read the article easy SEO tricks this time carefully.
Well, let's discuss how we perform keyword research that is best for optimised. First of all the brothers should be acquainted with the Google External Keyword Tool. So let us visit his website ....
The Link above is a tool provided by google to see the number of searches for a particular keyword. After the brother went into those links do the following things:
- Search column "Word or Phrase" and enter the keyword sibling wanted to see the variations. For Example "Business Online"
- Enter the captcha verification available, and
- Press the button SEARCH.
- This site will provide you with a great selection of keywords that are related to the keywords you input.
Important Factors In Choosing Keywords
- Pay attention to the balance of the value of competition and the number of monthly searches. Try to get the keyword competition is not too high, but many.
- We recommend that if your blog is still new, fokuslah to multiply the length of the keyword variations (consisting of 5 or more words). This is important, because you get out of breath when trying to master the key Word 2 word such as "tutorial blog". The short keyword and sought-after people, already a reputable blog rations and have authority.
- Reputable Blog usually aged, and older blog is a blog that had extraordinary numbers of backlinks in a way that is judged by the search engine robots are natural. (Try reading the article the influence of age on blog Google rankings)
THANK YOU VERY MUCH

If you are serious about blogging and doing so wish can get many visitors, then do the keyword research is a must. This is one of several important elements in building a blog that is sought after by many people. So let's see how to do keyword research to your blog.
This article is a more detailed explanation from the previous article on how to choose the right keywords for your blog.
This time I will make an example of the case:
Let's just say your blog is a blog a business engaged in the sale of the bag. Automatic primary key words from your blog is "selling the bag". How could you manage your new blog to defeat the bag sales site has been more seniors in cyberspace?
If you intend to make your blog master keyword "sale tas" then this is a very fatal mistake. Why? There are several reasons:
- This is so in general commercial words new blog won't be able to
- Very few people looking for items by using the two words. The average person who is intent on buying something using 4 or more words.
So let's first though the keyword "sale tas" was. Follow the following procedure:
- in the column "Word or phrase" enter keywords "sell" bag
- then click on "location and language columns" to change from "all" to Indonesia
- After that click on "Browse" (more details see below)

- This page will list all your keywords and their variations and the number of its search competition globally and locally.
- Try searching the medium kompetisinya to the bottom. After that choose the most its quest. (see picture below)

- From the picture above you can see me marking with two blue and Red column. Blue shows the variation of the word "sale tas", whereas red shows other keywords should we try.
- Tick the check box selected, then the keyword will be stored on the left sidebar page (see image)

- Note that in addition to each of your keywords there is a small arrow, click the arrow and select "View More like this"
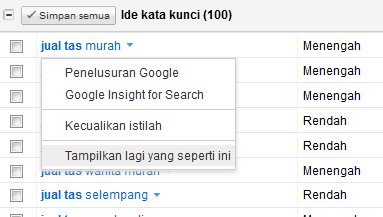
- This page will be back looking for variations in other words of your most recent choice .... So the more that you can mark (see figure below)

- Repeat this process until all you can mark 20-100 different keywords
- After that start to make 1 article for 1 keyword variation
- My advice should make 1 article per day and each article contains more than 500 words.
- For example for the word "cheap" branded bags we could make the article title "Sell Branded Cheap Bags are beautiful" or "Cheap Branded Bags Are the Trend this month" or "Branded Bags Cheap but not Cheap". Try making the title to around 5-8 words.
- So what if the keyword variations you've done you create the article? Created again from scratch, and continues over and over .... Isn't for the keyword "cheap branded bags" above there have been 3 kinds of variation? Please search for other variations. This is necessary because Google with Pandanya Algorithm like a fresh article.
- So take an hour each day to make a quality new articles, before you do your offpage optimization activities that day.
The first article, hopefully can help build a better blog many visits

Title tags, Heading tags and Meta Description should be different for each posting. This
paper is an update of a previous article about putting title tags and
meta description on the look of the old blogger.com (blogspot). Regarding
the old editors will soon be deactivated and the number of complaints
that his troublesome, so let's learn how to put a title tag and meta
description is more practical on the new look of blogspot. It's much easier.
TITLE TAG
To put a title tag, then make sure Title tags blog brothers like the following example:
<title><b:if cond='data:blog.homepageUrl == data:blog.url'><data:blog.title/><b:else/><data:blog.pageName/></b:if>
</title>
To see the code title tag on your template, please do the following procedures:
1. go to menu TEMPLATES
2. click the EDIT button HTML
3. a pop-up will appear, please click the CONTINUE button
4. a box will appear containing basic HTML of your blog
5. use ctrl + f to search for the code <title>
6. Please check whether the code is between <title> and </title> on your blog is already the same as above?
7.
If not, please remove all HTML code from <title> to
</title>, and copy and paste the above code red as his successor.
8. click Save to save the changes you made
If it hasn't got a title tag? It's easy, just copy the code above and place it just below the code <head> after that save changes.
To make it easier to install the meta description on any blogspot posts follow the procedure below:
 |
| example,we use website trikmudahseo.blogspot.com |
1. go to SETTINGS menu
2. Select SEARCH PREFERENCES Submenu
3. activate the option the META description TAG
4. enter a description at the column's sister Blog available
5. click Save changes
After
you do the 5 easy steps above, please enter the menu NEW ENTRY or EDIT
ENTRY to make a new article or editing an article long ago. To the right of the box to type will be incremented by one menu i.e. description search. Fill in the meta description of your article by clicking on the menu. The dropdown box will appear where you enter a meta description. Click Finish, and then you simply click PUBLISH or UPDATE at the top of the screen. (see the following figure)
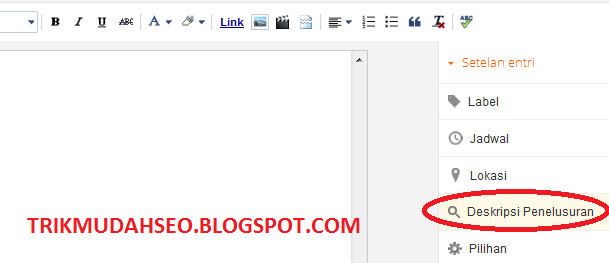
HEADING TAGS
Adding heading tags on the article also now has been very easy. On the icon already exists article Editors choice of heading tags. Look at the following picture.

You simply choose the HEADING for SUBSECTION HEADINGS for H2, H3, and H4 HEADINGS for the MINOR. Thus we have easier entered into various headings in the article.
Thus to add Title tags, Meta Description, and tags for each post Heading has been very easy. So please familiarise add this meta description
How To Write A Quality Article On SEO Standards? This is the 3rd phase of the 4 stages of SEO. Try to make a quality article from keywords already researched. If you don't know about how keyword research can be read from the following article:
# How To Do Keyword Research
After determining which keywords are going to be made to the article, then we are ready to start. Note the important factors when writing the following article:
# 1 Select article title
The first stage is to determine the title of the article. Make sure this title contain the most important keywords in the article. The
length of the title of the article should be about 5-7 words only, as
more and more reduced length density of keywords in it. If you want to make a splashy article titles should not to sacrifice the keywords in it. For example, if the title of his article "the Ipad 2 Price down again" simply changed to "Oh my gosh! The price of the Ipad 3 down again "
# 2 Select the URL of the article
If the title of the selected article is long enough, then it could be not loaded all of the URL of the article. For the user blog berplatform blogger can change the URL in the following manner. Look at the right part of the site type in your article. There is no one named permanent link menu. Click on the menu, it will open the display as below.
 |
| this image use indonesian languange |
You simply type in the last part of the URL. For
example, if the URL that I want is http://apricyber.blogspot.com/2013/02/how-to-write-standard-quality-seo.html,
then I type is how-how-writing-articles-seo standards of quality-(don't
forget the hyphen-included in the url). In this way the URL will be more SEO friendly.
# 3 use a Label in each article
We recommend that you use labels for brother articles. Select the most appropriate label for this is description of articles are made. To enter click Menu label Label at the right column of type article. If using more than one label, separate them with commas. If
your blog is a mix of themed and don't focus on one topic, then we
recommend that you place a label on the sidebar gadget to help the flow
of pagerank onto the pages of your blog article.
# 4 make sure Install Meta Description
This
Meta Description that will appear on Google search results snippets, so
make sure your meta description is also use keywords in your article. The length of the meta description that doesn't need to be too long, 150 characters is sufficient. But
to enable input of meta description in creating the article, please
follow the guidelines in the article how to install meta description.
# 5 Create Teroptimisasi Articles
The article should follow some brothers created the following rules:
- the length of at least 500 words Article
- each keyword is repeated at least 3 times in the article, (must keep the density of about 3-6% it only issues)
- keyword that appears first in the bold or italic should be
- use raw language to article quality is not reduced
- If you can, create again a phrase with keywords in articles and tag H2 or H3 Heading.
# 6 posted a picture in the article
Make sure you place images contain Alt tags. Alt tag tells Google about this duty image content, because Googlebot has not been able to recognize the images. If the file size is not too large images, because it could affect the page loading time. For the user, the image should be uploaded blogspot when writing an article, and be hosted on image hosting. Because sometimes other hosting cannot offset the speed of loading images from blogspot at rush-hour.
# 7 posted a Link in the article
If you really need to put up a link in the article, then follow some of the following rules:
Make sure all links open in a new tab
Not to be confused the link out and link to your own blog page. For links that come out be sure to use rel = "nofollow", while the article itself need not be nofollow.
Important!!! Try in your article there are at least two links to other articles on your blog if there is indeed a connection. Interlink like this is very important to enhance the capabilities of search engine robots from indexing your blog.
# 8 make sure your article is able to resolve the issue Or Serving the information searchable Reader
The goal is simple, to allow readers interested in reading other articles, or even come multiple times to your blog. This will be very good for the reputation of your blog.
Eight points above can help to improve the quality of blog articles.

Sometimes
we have a laptop is often little regard for software maintenance,
especially the laptop does need protection against software (software)
and hardware.But that will be discussed here is
the problem, because the software (software) software is already an
important part that we wear or daily use.
The
main problem of the us who have personal laptop is a problem on the
security of operating system is safe from viruses or otherwise.Moreover, it made us use a laptop as a primary tool in solving a lot of our work is facing daily.For it is here I want to share a way so that the laptop isn't bervirus.
Below I give way or an attempt to make the laptop not bervirus:
1. Install at least 2 antivirus which is local and external viruses virus
(try each virus antivirus mendukuung each other not to eat can be said
or antivirus antivirusnya clashed each other.I personally use Eset Smart Security 4 and Smadav Pro 6.1.
2. after my friend had antivirus.The
main recommendation is rajinlah update if your laptop is connected to
the internet and regularly update antivirusnya strive to anticipate the
development of malicious programs that develop when today, such as
viruses, malware and more.
3.
do not install software that isn't necessarily security installation,
sometimes not even install the software program intruder PAL which PAL
which PAL systems installed.Learn about the first software so that your laptop is secure from intruders or malware program that disisip them.
4. Do online scanning to more secure laptop buddy from antivirus.I
myself use the Eset Online Scanner can search from Pal. google the type
of scan can use PAL online for scanning files or data on the laptop's
PAL.
5. Scan every Flash that goes into the laptop, do not open the Windows Explorer try to scan directly.But most antivirus provides automatic've now scans removable disks are plugged in to your laptop.So it is safer to use flashdisknya.
That's
what PAL do to keep your laptop safe from virus, hopefully by reading
the article so that it is not your laptop more loving and bervirus more
merawar laptop is better so that it could be used for a long period.Thank you
We assume that you have already configured your hard disk the way you
want it - single, master, or slave. The photo below shows the hard disk
already fitted. As you can see, we can look right through the case
here. If we had slid the motherboard tray back into position, it would
have been impossible to screw the hard disk in from the left.

At the moment, we still have good access to the hard disk (bottom) and the floppy drive (top). You can see the screws for the drive on the side.
Use two screws per side on each drive. We would like to touch briefly on the topic of drive cooling, as it is quite important with the current 7,200 rpm drives. Hard disks running at 7,200 rpm can quickly reach temperatures in excess of 50°C. You should, therefore, always leave some space above them to prevent heat buildup. The power supply fan is normally powerful enough to provide adequate air circulation inside the case.
In place - sound card (left) and graphics card (center) in white PCI slots. There is room for a network card, if required.
Nowadays, graphics cards are usually fitted in the AGP slots provided specifically for this purpose. These are brown in color, in contrast to the PCI slots, and are generally located in the center of the motherboard. PCI graphics cards are rarely used. Now, select a PCI slot for each of your other plug-in cards, including the sound card. Before fitting an expansion card, remove the appropriate slot insert from the back panel of the case (or of the motherboard tray). As a rule, you need to undo a screw to do this, although sometimes convenient plastic clips are used. The insert may also form part of the back panel.Choosing a location for a PCI card will not usually be a problem on a simple system. In our experience, however, selecting an appropriate PCI slot can sometimes be problematic with some brands of motherboard. For example, IRQs can be reserved twice or even three times over. Resource conflicts can make it difficult for the operating system and motherboard to work together properly. This can often be solved by moving the offending PCI card to another slot or by manually reassigning IRQs. The other reason is more practical. If you see a large heat sink on a plug-in card, perhaps even with a fan on top, the chip underneath will be producing a lot of heat that has to be removed. There is only one reason we did not fit the sound card next to the graphics card: we wanted to keep some space between the cards in order to prevent heat buildup.
The RAM must be suitable for the motherboard. There are currently three types of RAM available: SDRAM, DDR SDRAM and RDRAM.
The motherboard's chipset determines which type of RAM may be used. You
will find the specification on the motherboard's box or in the
motherboard manual.


Installing RAM. A notch at the bottom of the memory module ensures that the RAM is fitted correctly. The notch is located in different places on SDRAM, DDR SDRAM and RDRAM.
DIMM memory modules have a notch underneath that lines up with a key on the memory slots. Although it is not possible to insert the modules the wrong way, you should line up the RAM with its slot before installing it. Then, carefully press the module into the slot. Caution is recommended, as too much pressure may damage certain tracks on the motherboard. It is best to push one side down first, and then the other. The notch will snap into its key as soon as one side is seated correctly. To make sure it is seated correctly, you can always take the memory module out again. Releasing the clips will pop the module out of its socket. Then, you can just lift it out.Passed the first hurdle. Motherboard with processor, cooler and memory.

Plenty of air flow. Here is the power connection for the cooler's fan.
You may have wondered why the connector lead for the fan has three wires. Two of these carry the power; the third is used for monitoring the speed of the fan. Therefore, the BIOS is always aware of the speed at which the fan is running.Minor Differences With The Pentium 4 System
Socket 370 (Intel Pentium III or Via C3), Socket A/462, and Socket 7 all use the same method of mounting the cooler. However, Socket 478-based Pentium 4 systems are slightly different. Intel specifies that motherboard manufacturers should provide a plastic guide rail to ensure that the cooler is always mounted flat to the surface of the processor. Also, the cooler is not locked down with clips but with a snap-in system, as shown in the following pictures.
Pentium 4 motherboards have a socket with 478 pins and a guide for the CPU cooler.

Attaching a Pentium 4 cooler
A cooler made of copper is recommended, since this material is a very
efficient heat conductor. You should know your processor's socket type
when buying a cooler. You have a choice of two types of cooler - one
suitable for both Socket A/462 and Socket 370, or one just for Socket 423 (Pentium 4).

Make sure that the cooler is in the correct position. Here is the cooler about to be connected with the socket.

Clips fix the cooler to the socket. This applies to Socket A/462 (AMD) and Socket 370 (Pentium III and C3)

Applying thermal paste to the processor.
You must apply thermal paste or a thermal pad to the top of the CPU. This will help to transfer heat from the processor to the cooler. Failure to apply a thermally conductive medium to the processor can cause it to fail! Unless you use thermal paste, any slight misalignment of the contact surface of the cooler, or even the presence of tiny specks of dust, will prevent heat from being efficiently transferred away from the processor. Thermal paste also fills the microscopic valleys in the contact surface of the CPU (known as the die). Some cooler manufacturers supply thermal paste with their products. If yours did not, it is available from most good computer or electronics stores and costs around two to three dollars.
Lift the lever on the CPU socket.

When the processor is in its socket, push the lever back down.
First, insert the CPU in its socket. To do this, raise the small lever at the side of the socket. If you examine the CPU from underneath, you will notice that there is a pin missing at one corner. Match this corner with the corner on the socket where there is a hole missing. The processor is keyed in this way to make sure it is inserted correctly. Please bear in mind that you should not force the CPU when inserting it! All pins should slide smoothly into the socket. If you are sure that you have positioned the CPU correctly (using the missing pin as reference), yet are unable to insert the CPU, it is likely that one of its pins is bent. If this has happened, straighten the pin using tweezers or a screwdriver. Once you have installed the processor, lock the lever back down.
Empty tray with six motherboard spacers.
Our case has a slide-out tray, which provides a very elegant way to install the motherboard and all of its components. Cheaper cases will have a mounting plate fixed permanently to the case. If you have this type, you should first lay the case on its side.Next, screw in the spacer mounts for fixing the motherboard. The photo shows six spacers already fitted to the mounting plate. There are usually more holes drilled in the mounting plate than you actually need. There are standard locations for these holes on the mounting plate, which correspond to the holes on the motherboard. How many of these are actually used depends on the board manufacturer. Cases are normally designed to accept any motherboard. Compare the available holes with the ones on your motherboard to determine where to fit the threaded spacers.

Spaced well away from the metal - the motherboard on the mounting plate.
Empty case with motherboard tray withdrawn.

The price of a case is a good indicator of its modularity and build quality. Cheaper cases often force you to assemble the PC in a specific order, are made of softer and/ or thinner metal, and may contain sharp edges. Expensive cases provide clever design features, a more solid construction, better finish, and are often fitted with more capable power supplies.
When you have opened the case by removing the side panels, you will see what accessories the case manufacture has supplied. A power cord and screws should always be included, and you will also often find a set of case feet.
Preparing To Fit The Components

Overview of all components (from left to right and top to bottom): network adapter card; floppy disk drive; CD-ROM drive; sound card; hard disk; ribbon cable; graphics card; RAM; CPU cooler; and, motherboard.
Let's take another look at the photo. The inclusion of a component from a particular manufacturer does not imply a recommendation on our part. We use them to illustrate the installation procedure of similar components. The choice of components is entirely up to you. You can always find reviews of the latest products on the Tom's Hardware site, together with articles on the latest developments and product recommendations.
In Part 1
of this series, we covered the fundamentals of the components used in
today's PCs, discussed some of the important aspects of hardware
configuration, and provided some shopping tips. Now, in Part 2, we will
delve deeper, using a full tower case to explain how to assemble a
standard PC.
An Overview Of Steps Involved
First, let's take a look at the various steps to putting together a PC.- Opening the empty case;
- Preparing to fit the components;
- Fitting the motherboard;
- Fitting the RAM, processor, and cooler;
- Installing the graphics card and sound card;
- Fitting the hard disk and floppy drive;
- Installing the floppy and CD-ROM drives;
- Connecting the ribbon cables;
- Powering the drives and motherboard;
- Connecting the cables for the case front panel;
- Final check.
The case we use has a slide-out tray for the motherboard and the expansion cards. There are a variety of case designs on the market, and we've discussed this in depth in an earlier article, entitled How To Select The Right Case . Take time to familiarize yourself with the case before installing any components in order to avoid having to remove some of them later!
Nowadays almost every computer we encounter is part of a complex network of computers. Suppose
that when a laptop or computer that used to stand on its own (stand
alone) then we add an USB Modem that is connected to the internet, then
our computer has been connected and are part of a vast network of WAN
(Wide Area Network).
In
the following article we will try to get to know the understanding of
computer networks, the benefits and the risks of computer networks and
computer networks Division based on broad areas namely PENAN, LAN, MAN
and WAN.
What is a Computer Network?
In
a simple sense of computer networks is the relationship between two or
more computer systems through communication media to perform data
communication with each other.
The Benefits Of Computer Networks:
The
main benefit we can feel from the formation of computer networks is the
ability to share resources (resource sharing) at our disposal such as
the wearing of a printer, hard disk, CD ROM and other peripherial
together, Exchange data (file sharing) and communicate with one another
(emails, chat up video conference).
Disadvantages Of Computer Networks:
In
fact the term may not be exact but a consequence of the loss of
connection between our computer systems to the network this computer
such as security issues (security) at both the resource usage of the
various interested parties not authorized or security issues (virus
threats) on the data that is exchanged.
Regardless
of the various risks that we have to face, it's currently connected to
the computer or is part of a network computer is a thing that could not
be avoided.
Types Of Computer Networks
Types of computer networks based on the coverage area can be differentiated into several types, namely PENAN, LAN, MAN and WAN.
Indonesian languange:
1. PAN (Personal Area Network)
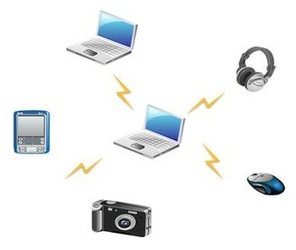
At
the moment we are connecting the computer or other device such as
mobile phone, PDA, keyboard, mouse, headset, wireless, camera and other
equipment which are close enough (4-6 meters) then we have established a
Personal Area Network. The most important thing is that in this our own PAN control (authoritas) on all the equipment. In
addition to the dihubungkn directly to the computer via the USB port or
FireWire, PAN also frequently formed with the wireless technology like
bluetooth, Infrared or WIFI.
Indonesian languange:
2. LAN (Local Area Network)

This is a very popular computer network. LAN (Local Area Network) is a computer network that covers a small area; as the campus computer network, building, Office, in the home and at school.
Indonesian languange:
3. MAN (Metropolitan Area Network)

Metropolitan
Area Network (MAN) is a network in a city with high-speed data transfer
between different locations such as offices, campuses, Government, and
so on. MAN is a composite network of some LAN. The reach of this MAN ranged from 10 to 50 km
Indonesia languange:
4. WAN (Wide Area Network)

WAN
(Wide Area Network) is a computer network that covers a large area, for
example, that computer networks between regions, cities or even
countries, or can be defined also as computer networks require routers
and public communications channels. The Internet is an example of a WAN network.
Indonesian languange:
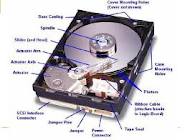
When are we going to buy a hard drive, the first thing to do is determine the hard disk specifications we need. General specifications hard drive we can see on the outside of the hard drive (wrap). Examples of hard drive specifications such as "Seagata Barracuda 7200 SATA 500 GB 32 MB Cache Buffer 3.5 inches".
Hard drive specs from the example above, we can see some hard drive specifications that we have to take note of the following:
1. hard drive Type
Is the first hard drive specification we will see. For this there are various types of hard drive such as ATA (IDE), SATA, SCSI and SAS. For an explanation of each of the tpe inidapat hard drive seen in my article "know your type of hard drive".
2. hard drive Capacity
The capacity of the hard drive is a hard drive storage size. Hard drive capacity is the second hard drive specifications that we have to look at when buying a hard drive. Hard drive capacity is currently available in the market is 80 GB, 160 GB, 250 Gb, 500 GB and 1 TB.
3. Form Factor
The
third hard drive specification is the form factor, form factor is the
physical size of a hard drive that is represented by the midline an
used. At the moment it is known two kinds of form factor hard drive, IE the size of 3.5 inches and 2.5 inches.
4. the speed of the hard drive
The
speed of the hard drive is basically a measure of the speed of an hard
drive to do one lap in one minute so that the stated Rotation Per Minute
(RPM). The higher the round this means hard drive konerja the better.
5. the buffer Cache
The last hard drive specifications that we can see in choosing a hard drive is a cache buffer. The buffer Cache is integrated in a memeri hardisk. Cache buffer serves to store data that is requested by the RAM completely, so it does not need to be taken from an. The larger the buffer cache means faster data transfers so that the hard drive will also increase performance.
indonesia languange:
About This Blog